![]()
My resources
Shortcuts
> The first time you use TourSolver: creating a team
> Making changes to an existing team
> Creating / Managing several teams
> Managing mobile app users (TourSolver Mobile)
Basic principles
Configuring the My Resources page (this title may vary depending on whether you have defined your own terms in the My Activity page) is a necessary step when you first use TourSolver. Once the configuration has been set up, it will be applied to all your simulations:
This page allows you to describe the characteristics of your team (resources and vehicles) and invites you to:
- create one or several resources in one go with common characteristics
- configure your resources (localisation address, working schedules, costs, capacity etc...)
- define a series of advanced constraints
- customise the characteristics that are specific to each resource
- add or delete resources to/from a team that already exists
Resource constraints are fully documented in the Toursolver constraints reference guide. To access the guide, click on the button below:
 It is essential to complete the My Activity step when first using TourSolver. The parameters defined in this tab are a constant for the application, and common to all simulations you create or reload subsequently.
 The interface displays a grey "information" icon in front of each parameter or constraint, giving access to in-line help that guides you in how to use this function and input relevant data. Find out more >
Utilisation
The first time you use TourSolver: creating a team
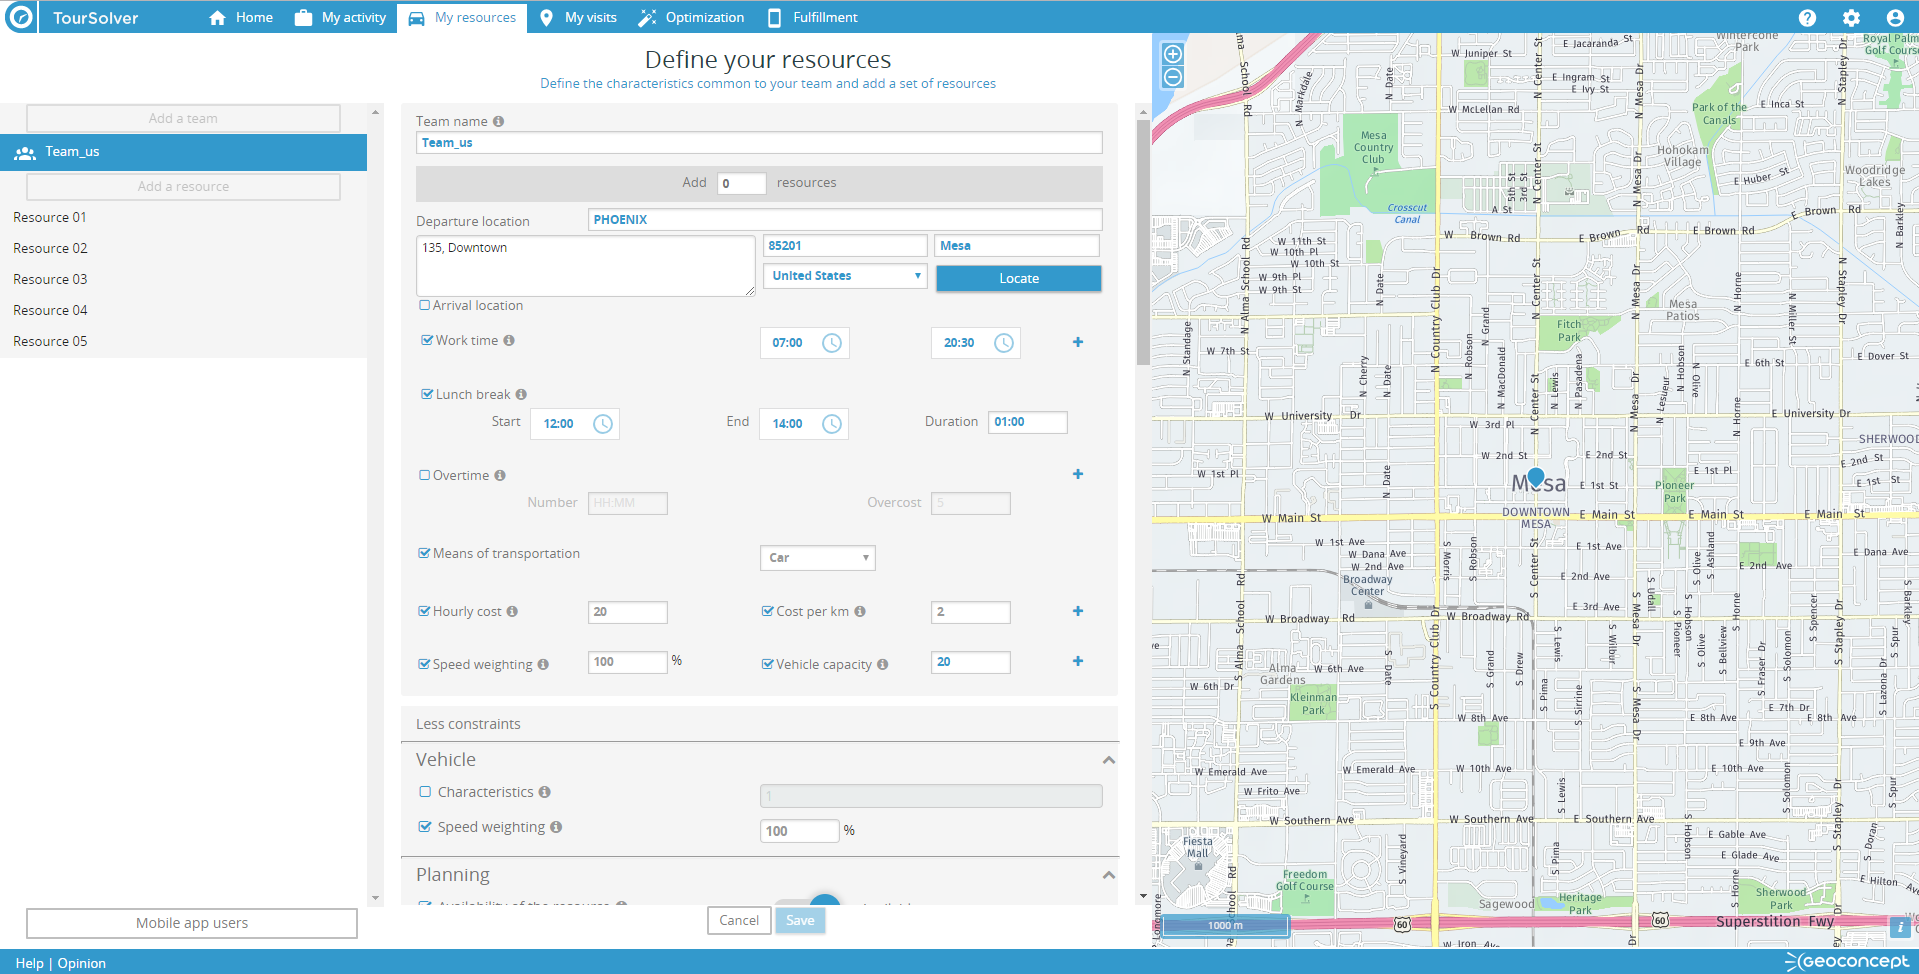
The first time you use TourSolver, the wizard simplifies the creation so several resources can be created at once, simply by specifying the number of resources to create and then defining all characteristics common to the team.
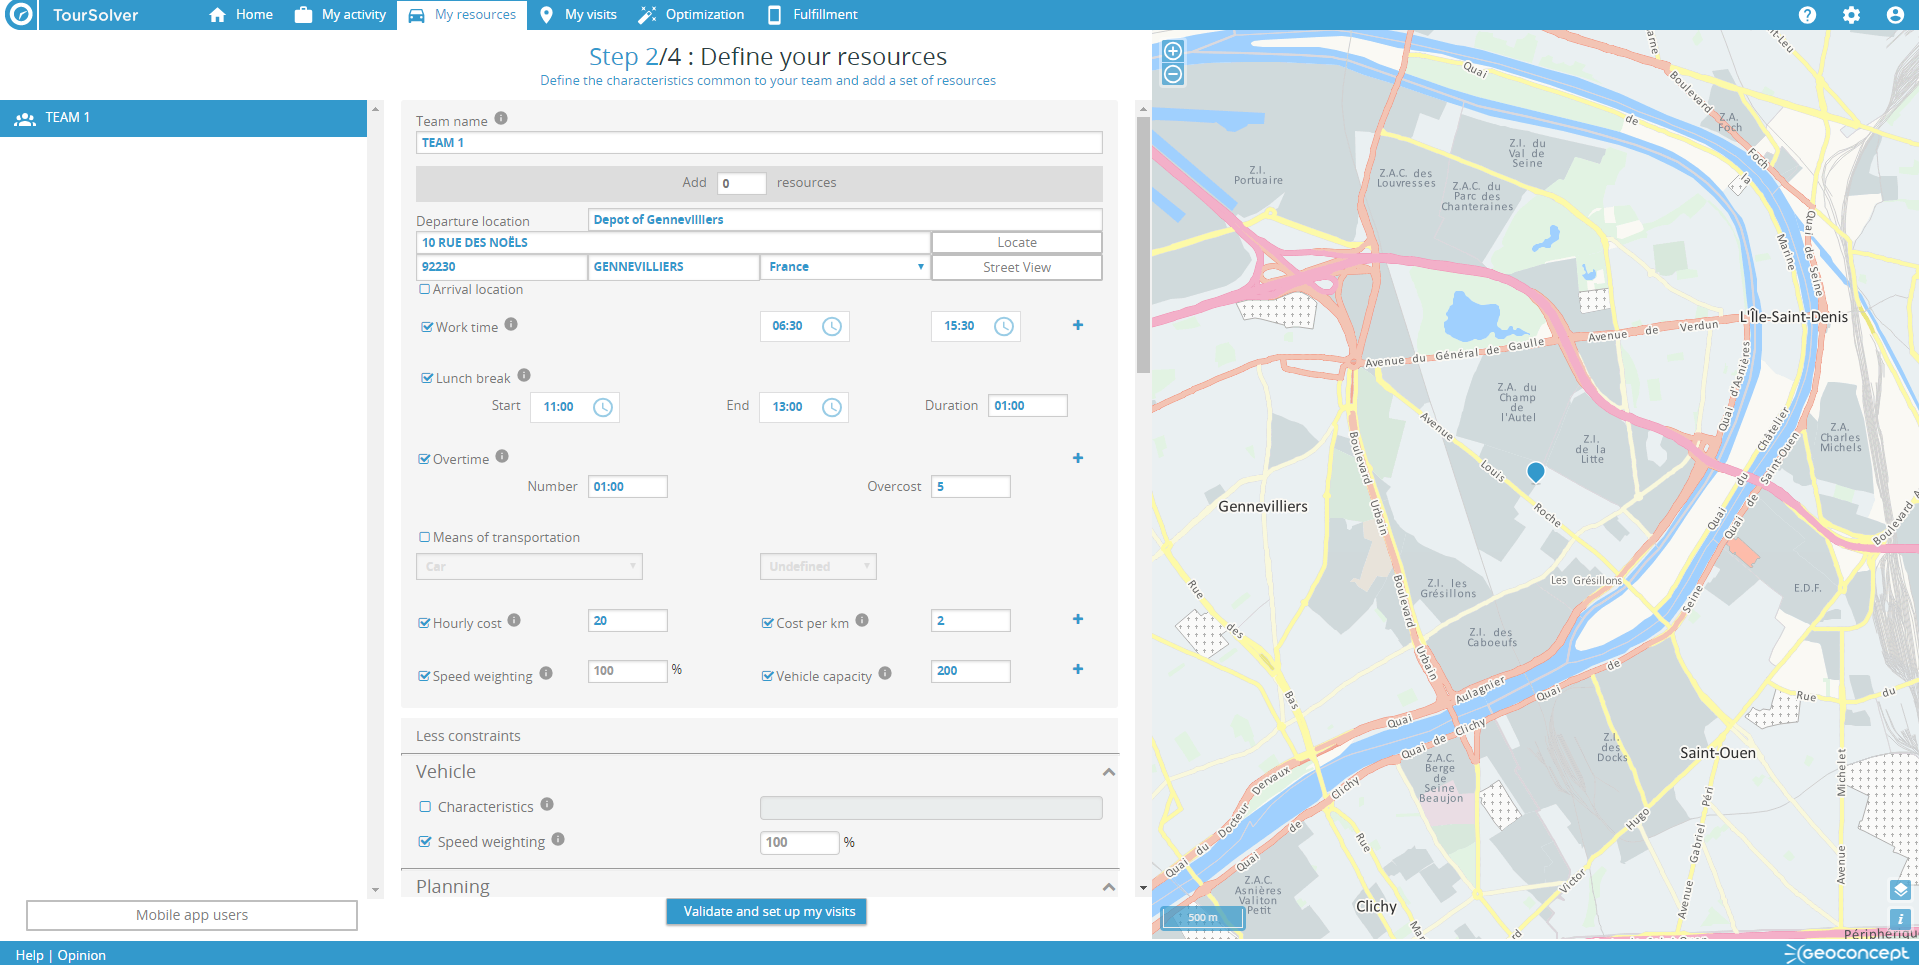
To create a team:
- Choose the name of the team (the name My Team is suggested by default)
- Enter the number of resources to add (by default, TourSolver suggests adding just one resource)
- Enter the departure point address for the resources and then click on the button to validate the address entry and see the location on the map. You can navigate between the various display layers (transport, transport + traffic, satellite…). This address is common to all resources in the default team but can be personalised by selecting a resource after creation. You can check the accuracy of the suggested location by clicking on Street View to open a page in Google Street View.
You will need to enter and validate at least one address to be able to validate the creation of a team. The country featuring in the address must be the same as the default country defined in the My Activity page.
- Define (as an option, and if it exists) an arrival point that is different to the departure point, and if it exists, identify the point (defining and localising the address as the departure point)
- Define the basic constraints in TourSolver such as the working hours, times of breaks or overtime hours, costs, speed weighting to apply in the route calculations as well as the vehicle capacity in the case of delivery/pick-up of goods.
- Click to access More constraints and you will be prompted to activate and configure advanced resource constraints. Each constraint is optional.
- Finally, click on the button to create the resources and continue in the TourSolver wizard with the import and configuration of visits.
 The check-box on the left of each constraint allows you to activate or disable it depending on whether you want to use it or not to optimise your routes. Some constraints (working and opening hours, costs, capacities, speed weightings) are checked in the activity by default. You can uncheck those you don't need. We recommend, however, keeping the activity costs enabled since TourSolver will base its calculations on these costs when optimising routes. In the More constraints dialogue you should - in the majority of instances - check the boxes corresponding to the advanced constraints you want to activate in order to configure them so they can be used by TourSolver.
Making changes to an existing team
Once the first resources have been added to a team (the first time you use TourSolver) you can go back to the My Resources page at any time to consult or modify the parameters.
This means you can:
- modify the common characteristics of all resources in the team
- customise the characteristics specific to each resource
- add or delete resources to a team that has already been set up
Modifying the data relating to a team
To modify the data for all resources in a team:
- click on the My Resources tab in the TourSolver menu bar
- the data for the team display, and can be modified
- click on to save any changes and apply them throughout the application
Modifying the data relating to a resource
To modify data relating to one resource in the team:
- click on the My Resources tab in the TourSolver menu bar
- select the resource to be edited in the list on the left
- the data specific to this resource display: data inherited from the team data display in grey, data specific to the resource display in blue
- a new email address field is then available for each selected resource and will serve for automated sending of emails with the relevant route plans
- customise the data specific to the selected resource
- now click on to save the modifications and apply them subsequently throughout the application
Advanced constraints available via the More constraints link are only accessible if they have been enabled at team level.
To activate an advanced constraint on the team, make it accessible, and customise for the resource, proceed as follows:
-
Select the team in the left-hand pane
-
Click on More constraints and check the box next to the constraint to activate and customise for the resources
-
Apply a default value that will be inherited subsequently for all resources
-
To customise the fixed default value for a resource, select a resource and then click on More constraints, the activated constraint for the team is then visible: set the value as required so it is specific to this resource.
To configure a resource as a TourSolver mobile app user:
- At the bottom of the form for a resource, click to enable the Mobile app user option.
- Once the option has been enabled, choose a mobile app user in the corresponding list
- If no user exists or is not available in this list, click on the + button for add mobile app user.

Adding a resource
To add a resource to a team that already exists:
- click on the My Resources tab in the TourSolver menu bar
- click in the list to the left of the button
- the resource is automatically created with a default name
- select the resource in the list on the left to display its related data
- enter the data specific to the selected resource
- data specific to this resource display then in blue, data inherited from the team data display in grey
- click on to save the modifications and apply them subsequently throughout the application
Deleting a resource
To delete a resource from a team that exists already:
- click on the My resources tab in the TourSolver menu bar
- point the mouse cursor at the resource to delete in the list on the left, and a dedicated delete icon then displays
- click on the icon to delete the resource

- the resource is then automatically deleted throughout the application, and it will not be necessary to save the page
Create / Manage several teams
You can add/edit/delete several teams in the application. When you run the route optimization, you are requested to choose the team to optimize.
TourSolver suggests a multi-team management but optimization of routes remains at the level of individual teams.
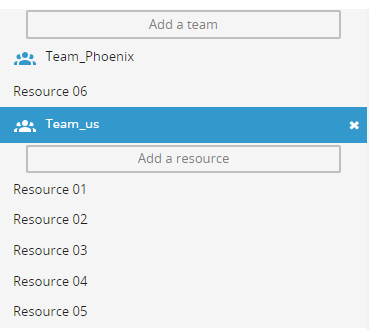
Add a team
The button displays the team creation form, as when the first team was created. Follow the same procedure to add and configure resources for each new team.
Repeat the operation as many times as you have teams to manage.
Edit a team
Proceed as you would usually to edit an established team.
Delete a team
Proceed in the left-hand pane as though to delete a resource, using the cross icon to the right of the team name.
Manage mobile app users (TourSolver Mobile)
At the bottom left of the page, the button opens the list of users so you can add, edit, or delete as required.
A mobile user account includes an identifier (email address), a password and the association to a resource belonging to a team.
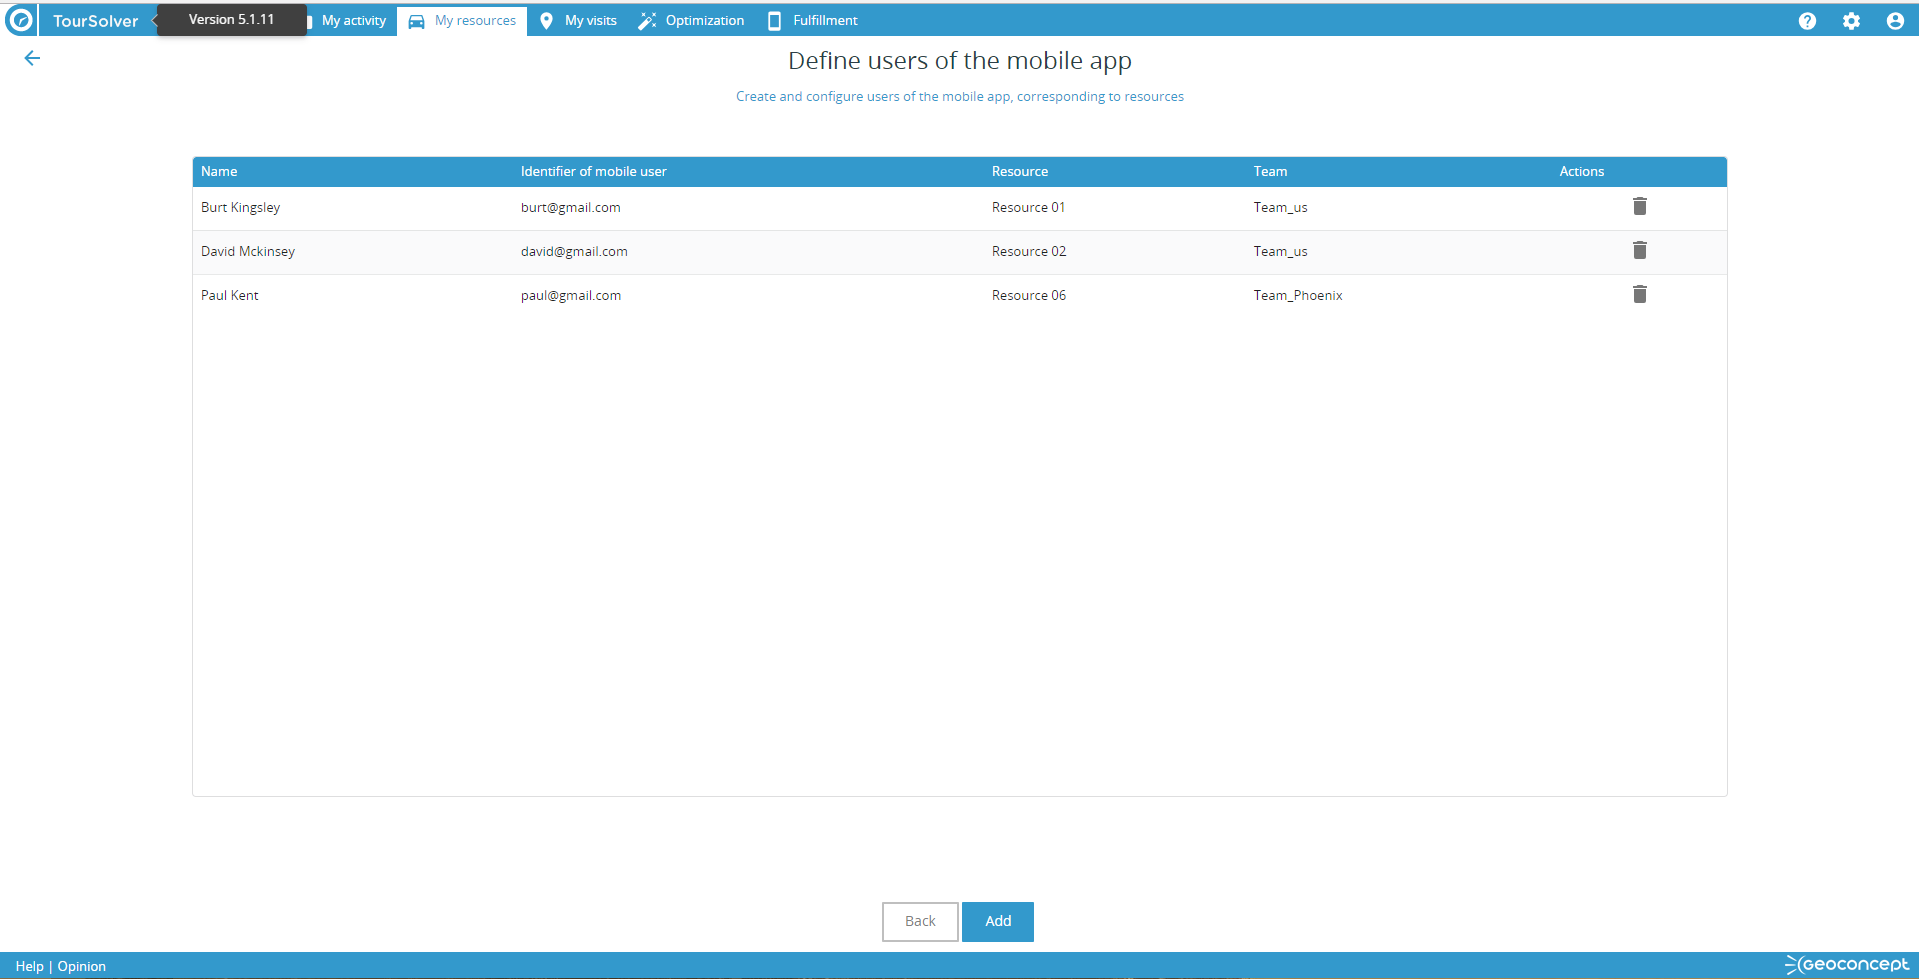
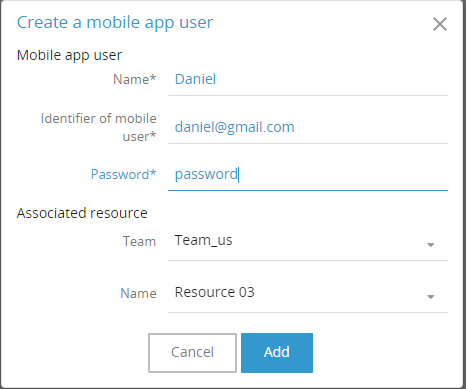
Add a mobile user
To add a mobile user, click on . A window prompts you to enter the information needed to create the mobile app user account:
- the name of the mobile app user
- a login identifier (this has to be an email address)
- a password
- the team of the resource associated to this mobile user
- the name of the resource associated to this mobile user
Identifiers and passwords need to be communicated to mobile users to enable them to log in to the TourSolver mobile app.
Edit a mobile user
To edit the characteristics of a mobile user, click on the relevant line in the list of mobile users.

A window opens to allow editing of the information for the mobile app user account:
- login identifier (email address)
- password
- team of the resource associated to this mobile user
- name of the resource associated to this mobile user
- finally, it is possible to disable (temporarily for example) access to the mobile app for the user
Delete mobile user
To delete a mobile user, click on the Trash icon in the list of mobile users, then confirm the deletion.
WARNING: Deletion of a mobile app user account will be permanent, and all available data in the associated Fulfilment tab will be lost.
Return to managing resources
To return to the resource management page, click on or on the back-arrow at the top left of the screen.
Validation
When you first use TourSolver, the button saves the parameters and automatically moves you on to the next step of importing and configuring visits .
The page can be modified subsequently at any time and the button saves the modifications and then applies them throughout the application without your needing to visiting another page.
Happy TourSolving!
> NEXT ARTICLE: My visits – importing and associating data
> ARTICLE OF INTEREST: Resources constraints reference guide