 My Visits - Data import and association page
Shortcuts
> Preparing your data or using the example data
> Choice of the reference spreadsheet
> Association of fields and configuration of constraints
Basic principles
Configuring the My Visits page (or another title, depending on the default terminology applied or customised in the My Activity page) is a necessary step each time a simulation is performed with a view to optimising a route plan. Each route optimisation starts with the import and configuration of constraints for your visits:
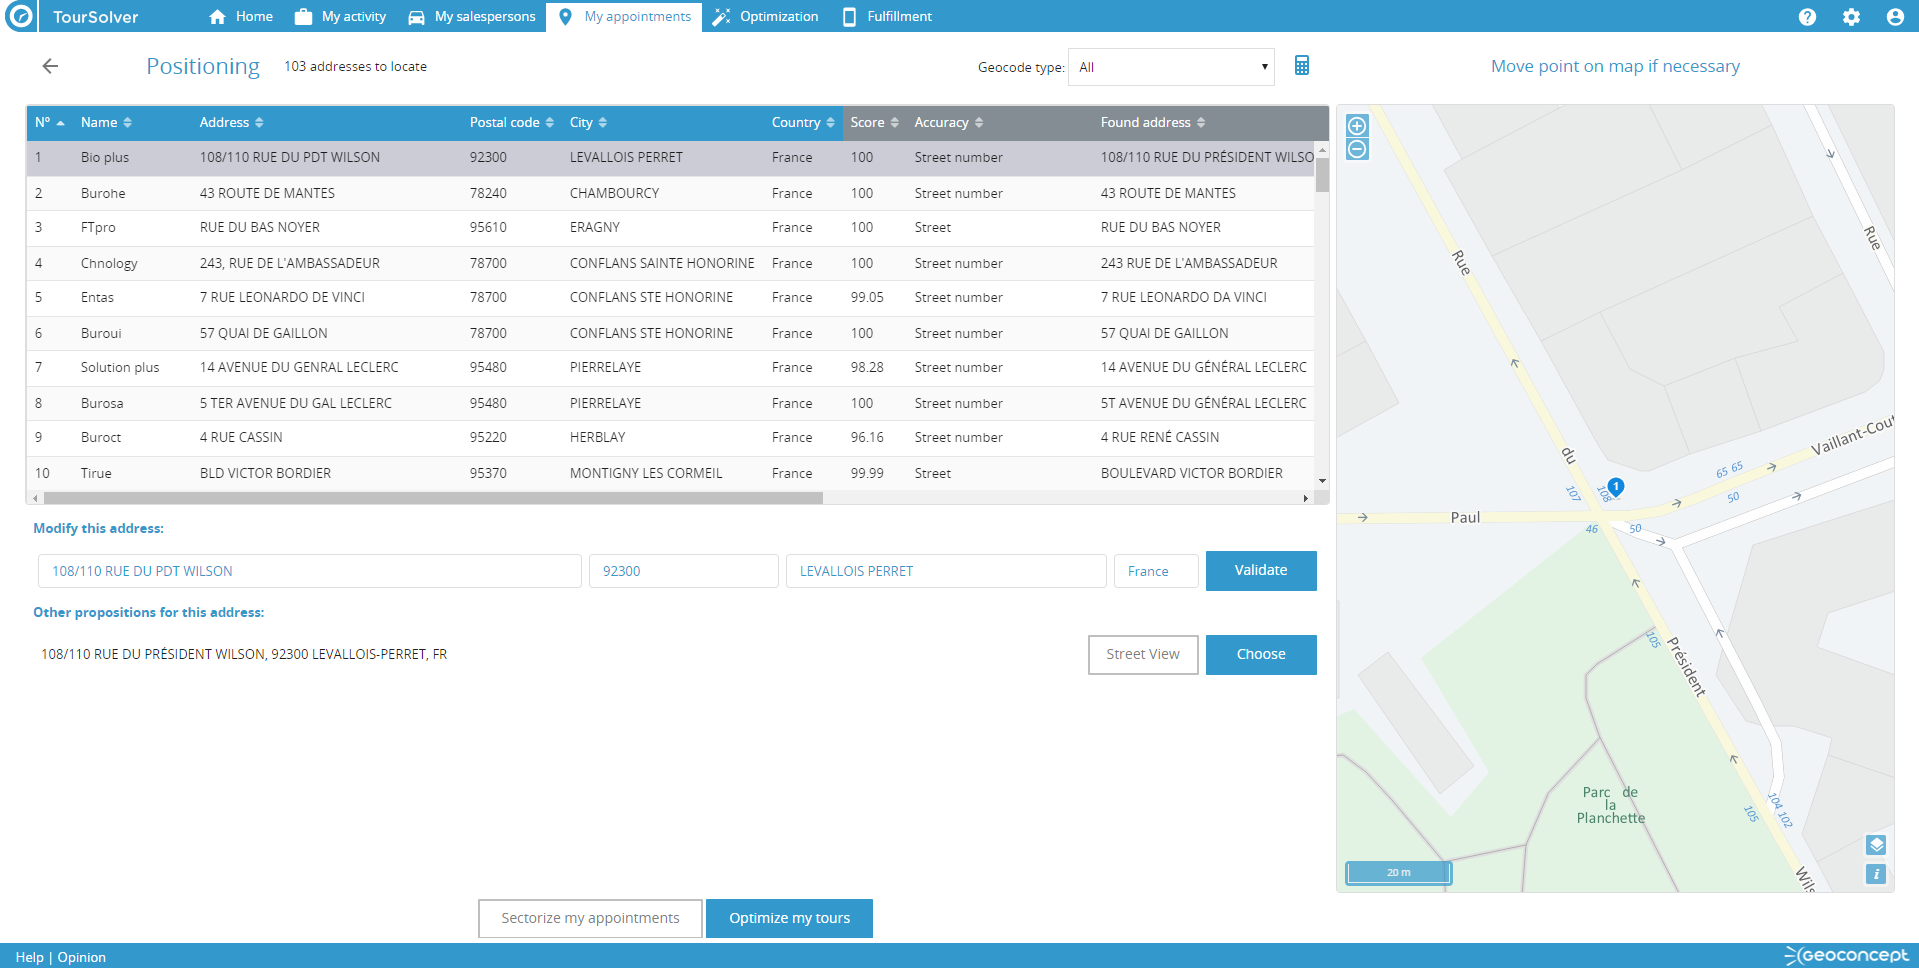
Addresses are then localised automatically, and can be validated via an interactive wizard, before sectoring visits or performing a route optimization.
This page therefore serves to:
- import a data set via a file or from a datasource in the Cloud
- choose the spreadsheet containing your visits in the dataset
- configure the association of your data with TourSolver and configure the constraints
- localise the addresses on a map and verify they are correctly positioned with the help of an interactive wizard
- apply geographic sectoring on visits to fulfil, using a resource assignment constraint, or by balancing sectors according to chosen criteria
The first three steps are grouped together in the first page, and the step of localisation takes place in a separate, dedicated page.
Utilisation
Preparing your data or using the example data

Preparing your data
On opening the My Visits page (or another name, depending on the terminology defined in the My Activity page), the wizard allows you, at the bottom of the page, to download a model visits file. This Excel file is empty, and helps you explore the data that can then be configured for your visits to optimise in TourSolver. This will greatly simplify your first attempts to use and configure the application.
To download a visits file model:
- click on the My Visits tab (or another name depending on the terminology defined in the My activity page)
- at the bottomm of the page, click on the link to Download a model visits list
- open this file in a spreadsheet (Microsoft Excel, OpenOffice, LibreOffice, Google Drive...) and fill the spreadsheet with the visits to be made with your customers.
 For more information about how to use constraints that can be associated to your visit in TourSolver, refer to the TourSolver Constraints Reference Guide
- save the data in one of the many formats compatible with TourSolver :
- XLSX or XLS (Microsoft Excel)
- ODS (Open Document Spreadsheet)
- CSV (text separated by semi-colons)
- TXT (text separated by tab characters)
Refer also to the Frequently Asked Questions page to assist you in finding your way around TourSolver if you have no data (Can I try using TourSolver even if I have no data?).
Using the example data
When you open the My visits page (or another name for the page may have been defined under My activity), the wizard allows you to download, at the bottom of the page, user ready example files of data. In the TourSolver Help article you can download two example files:
> Example file of visits (Paris): 50 visits for 5 resources in one day
Test TourSolver using a ready-to-use file, having first configured My activity and My visits following the configuration advice indicated.
> Example file of visits (Ile-de-France): 108 visits for 3 resources over 5 days
Test TourSolver using another ready-to-use file, having first configured My activity and My visits following the configuration advice indicated.
Importing data
When you open the My Visits page (or another name, depending on the terminology defined in the My Activity page) the wizard allows you to import your visits.
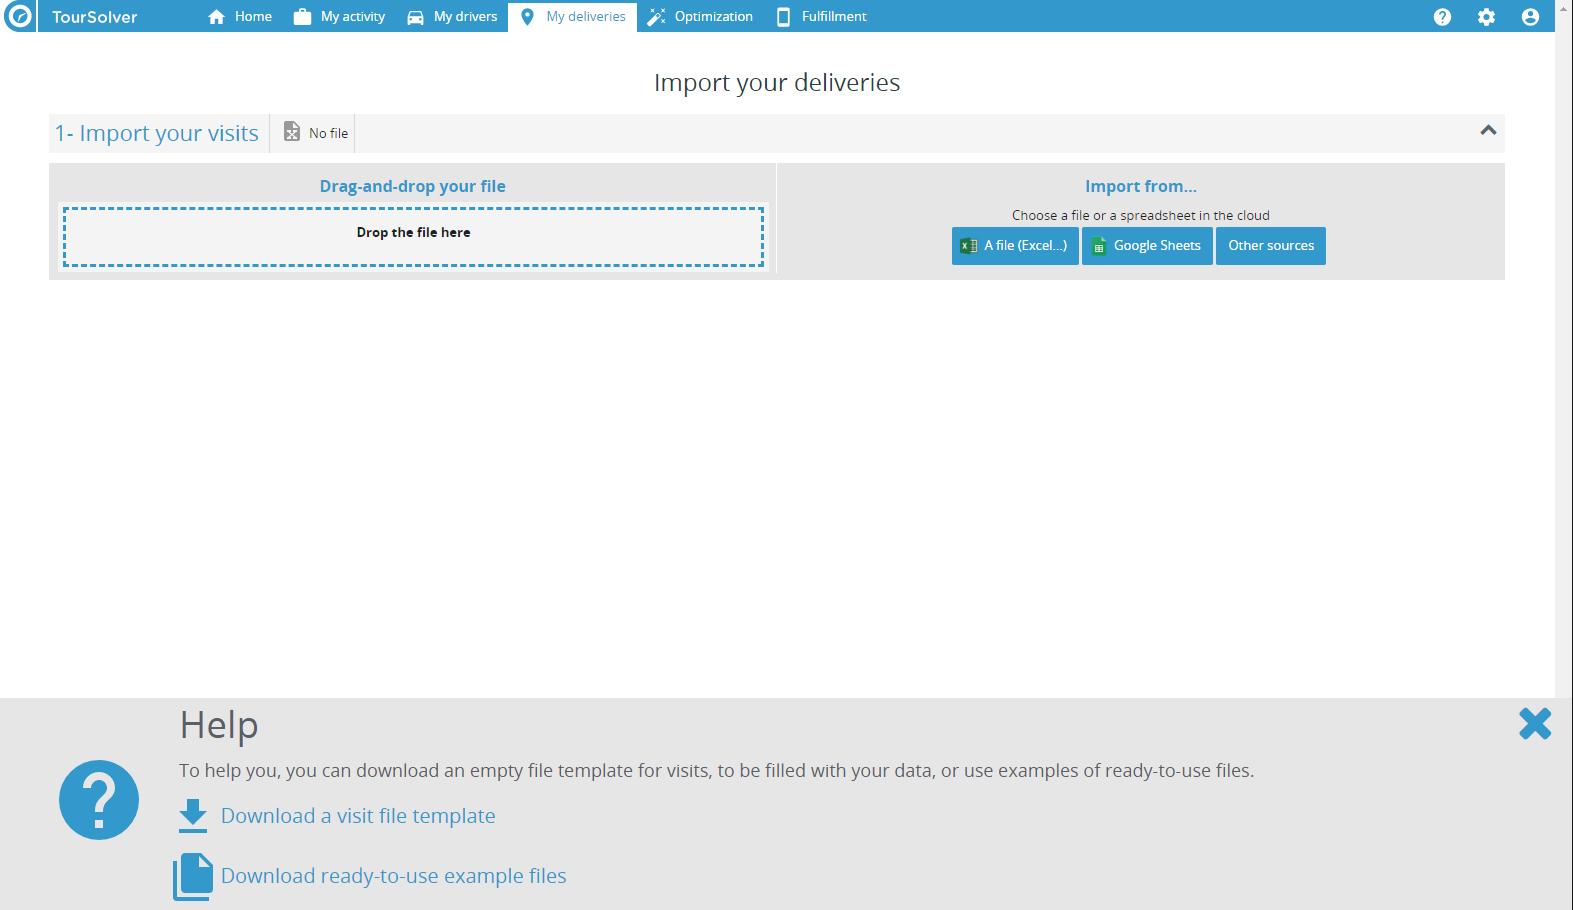
To import your visits, you can choose one of the following methods:
- from your file explorer, drag-and-drop a file in Excel format (XLSX or XLS), ODS, CSV (text separated by semi-colons) or TXT (text separated by tab characters) into the drop zone on the left
- import a file in Excel format (XLSX or XLS), ODS, CSV (text separated by semi-colons) or TXT (text separated by tab characters) browsing your disk or local network for the data files
- import your visits from the Cloud by choosing a Google Sheets source (Google Drive spreadsheet), Microsoft OneDrive (an Excel 365 spreadsheet) or Outlook connector.
Once the data source has been imported, it is loaded into TourSolver and a data preview displays.
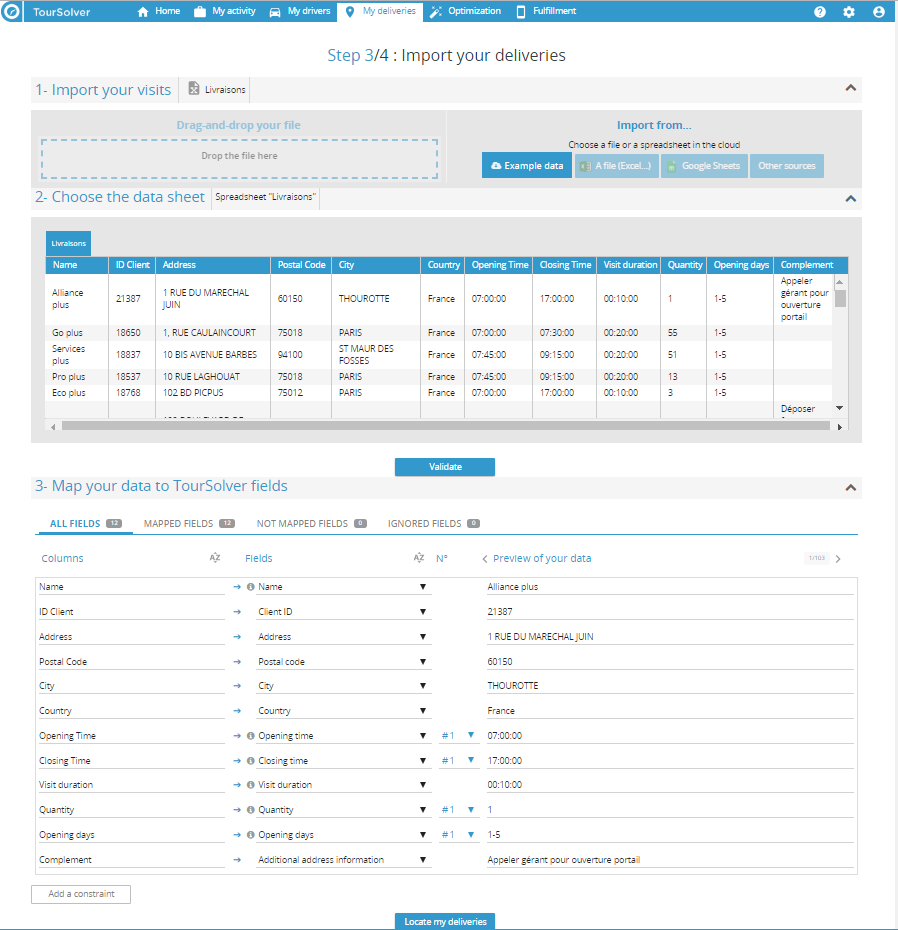
Choice of the reference spreadsheet
The preview of data allows you to choose from several spreadsheets (if the data are stored in an Excel, ODS, or Google Spreadsheet file).
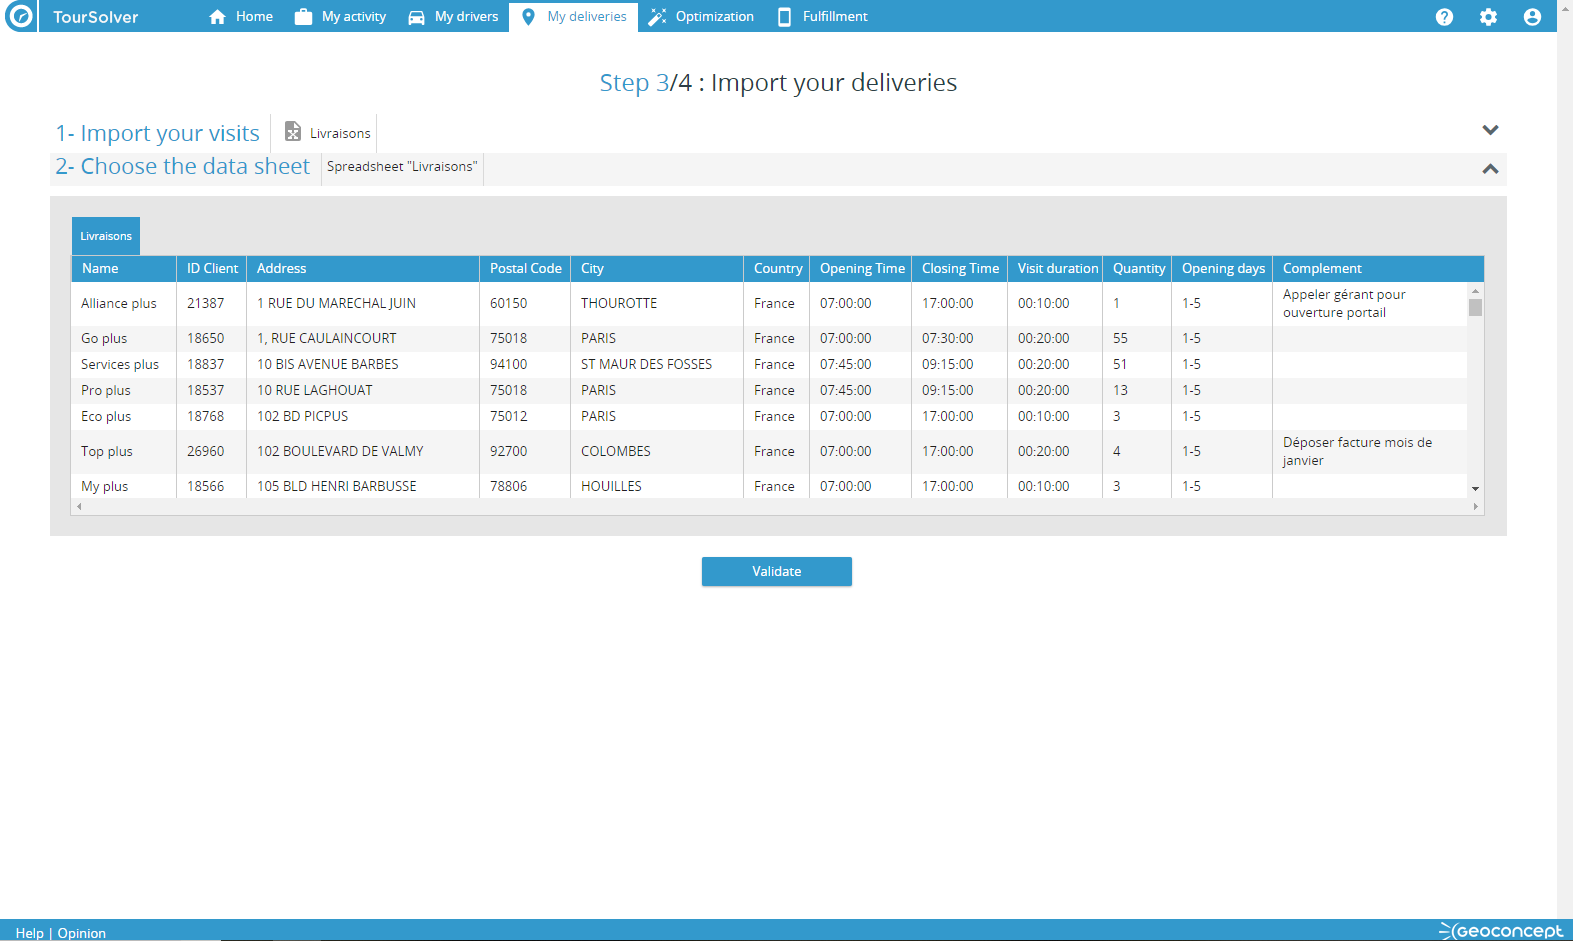
To choose the reference spreadsheet:
- Click on the spreadsheet name to use as reference
- Click on the button to move on to the step of associating fields and configuration of constraints for visits.
Association of fields and configuration of constraints
 The interface displays a grey "information" icon in front of each parameter or constraint, giving access to in-line help that guides you in how to use this function and input relevant data. Find out more >
This step allows you to verify or modify the automatic association of imported fields with the data and constraints in TourSolver. It is an important step siince it defines the correct configuration of all the constraints to respect for visits during the optimisation of routes.
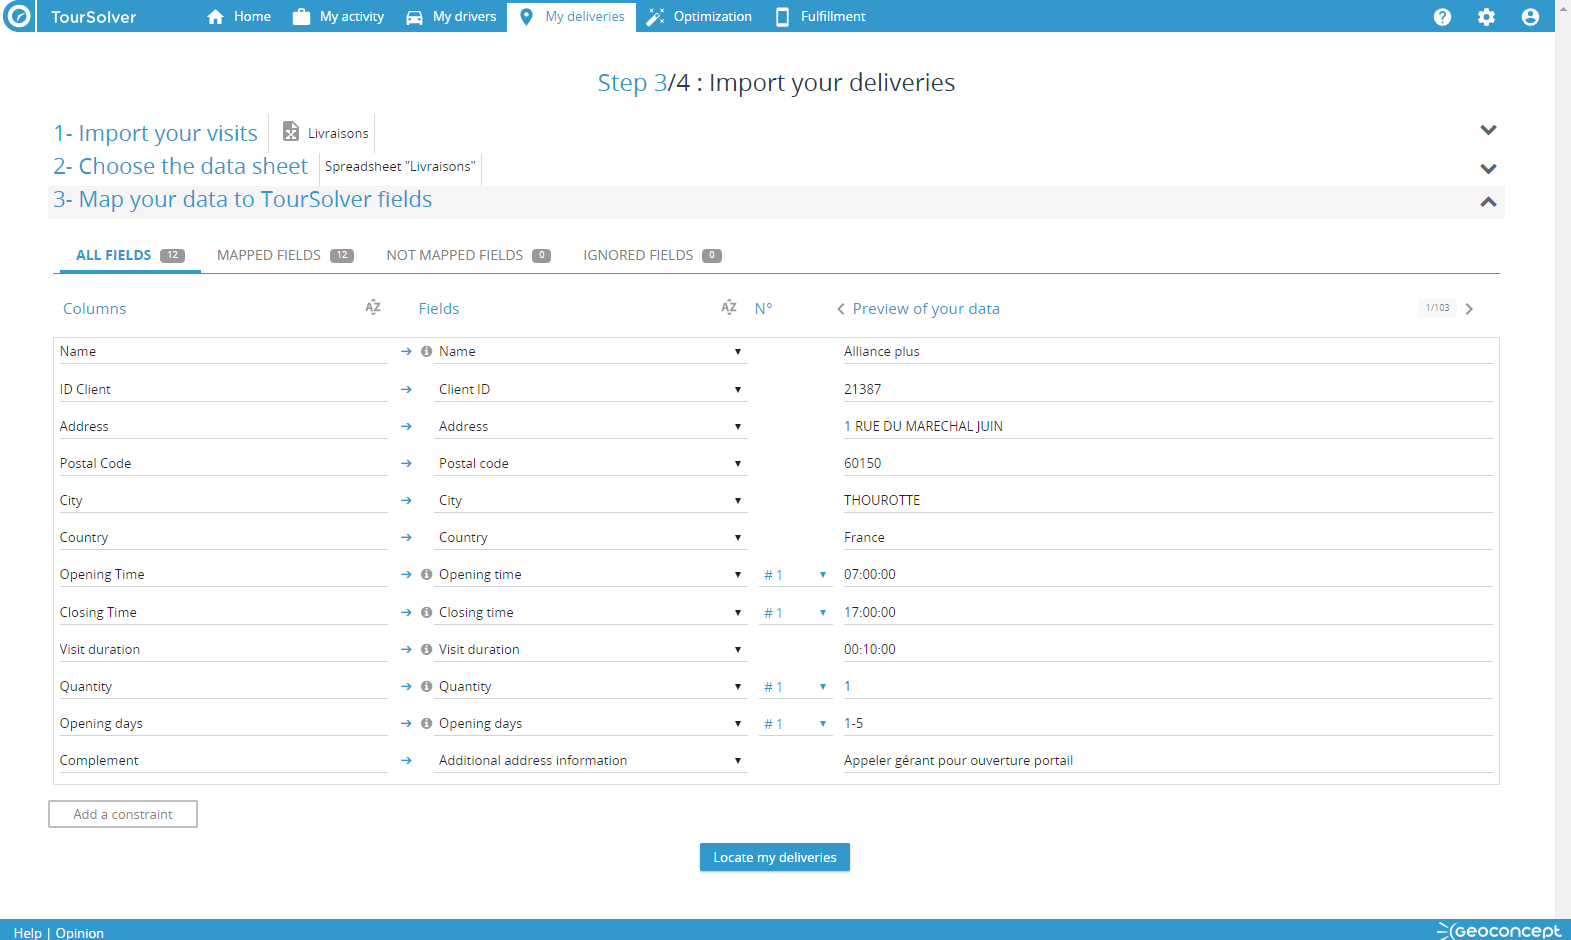
This step is made up of 4 tabs, offering a choice of different views of imported data:
- by default, the first tab displays ALL FIELDS for imported data
- it is possible to filter on MAPPED FIELDS only
- it is possible to filter on NOT MAPPED FIELDS only
- it is possible to filter on deliberately IGNORED FIELDS only
In the 4 tabs, a Preview of your data option on the right enables consultation of each column imported, using the < and > keys to browse the imported data.
The following actions are possible:
- verify or modify the automated association between the column of your imported data (on the left) and the corresponding data or constraint in TourSolver
- if certain columns have no association at all
- if there are columns of your data that you do not want to use in the optimization, nor in exports of the optimized route plan, choose Ignore this column in the Fields column. The ignored columns are then placed in the Ignored fields list
- if one or several constraints (such as the customer visiting hours) are instantiated several times, the third column allows you to verify/modify the number to be applied. In this way, it is possible to associate the fields for the start/end of the customer visiting times or the quantity to deliver/collect if there are several different types of product to deliver/collect.
- if some of the columns are only descriptive, and are not constraints that will be useful during the optimisation, choose to associate them to Other data in TourSolver
- It is also possible to Add a constraint at this precise instant, the values of which will be common to all the visits (for example, a second visit time window if this has not been defined previously in the imported file). To do this:
- click on
- a line is added at the end of the list of columns
- modify the name of the column on the left
- define or edit the association, when this is automatic, with a data item present in TourSolver in the drop-down list
- if necessary, verify or modify the number if the constraint can be used several times
- finally, enter the unique value common to all visits for this constraint, in the last column in the interface
Field associations will be carried forward from one visit import to another so long as the structure of the imported visit file remains the same.
Once the configuration of data and constraints is complete, click on to run the automated process of geocoding of addresses for your visits.
Now you can continue configuring your visits for optimisation with the step in which you localise your visits.
Outlook connector

It allows to:
- Import Outlook contacts
- See them on a map
- Sectorize them
- Optimize them
- Reimport routes to Outlook calendar.
This feature will suit your organization's traveling salespeople. Don't hesitate to tell your colleagues about it: this free option for all PREMIUM license holders will save them valuable preparation time.
This connector allows you to import all contact information (addresses, email, phone numbers etc.) from your Outlook folders. TourSolver allows you to enrich them with a visit duration for your contacts.
Once your contacts are imported, you will be able to use all the mapping capabilities (geocoding, thematic map, heat maps, etc.), geographic sectorization, and route optimization of the application.

Figure : See and optimize your contacts from TourSolver
Happy TourSolving!
> NEXT ARTICLE: My visits - locating addresses to visit on a map