 Configuring the TourSolver mobile app
Shortcuts
> Fields in the visit form and visit report
Basic principles
The TourSolver mobile app allows resources in the field to receive details of routes to be fulfilled and to interact as they proceed, mainly so they can share times and statuses of visit fulfilment.
This function allows you to define common parameters for all TourSolver mobile app users.
Utilisation
 Modifications made to parameters of the mobile app take effect when users log off or log back on.
To access the TourSolver mobile app configuration from the user menu at the top right, click on Configure the mobile app.

A window opens to give access to the parameter settings.

Options
This section has general option settings relating to interactions between TourSolver and the mobile app:

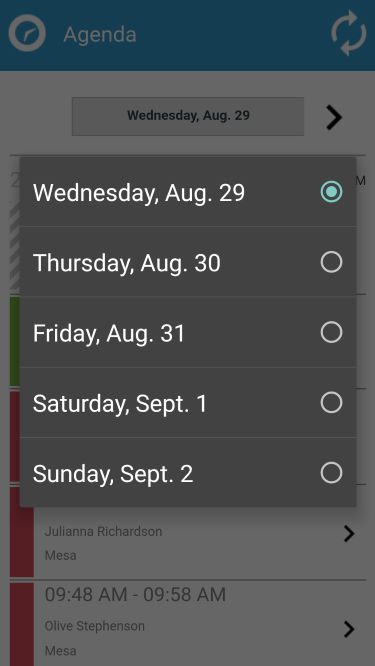
Number of days reachable in the agenda
This parameter sets the number of days that can be consulted in the TourSolver mobile app agenda. Agenda visibility can be set between 1 day (in which case only visits to fulfil today will be visible) and 31 days maximum. This then allows you to browse between several dates from the Agenda module.
Automatic tracking frequency
This parameter sets the duration in minutes between two automatic synchronisations of data between TourSolver and the mobile app. If no user manipulations are detected on the part of the app user, synchronisation is automatically applied as defined by this frequency. Other data exchanges are also applied in real time depending on the actions of the user (appointment life cycle).
 TourSolver mobile app can also handle manual synchronisation (icon at the top right of the agenda or function in the welcome page menu).
Visits
This section contains parameters related to the life cycle of visits and the possibilities offered in the mobile app while routes are being fulfilled:
![]()
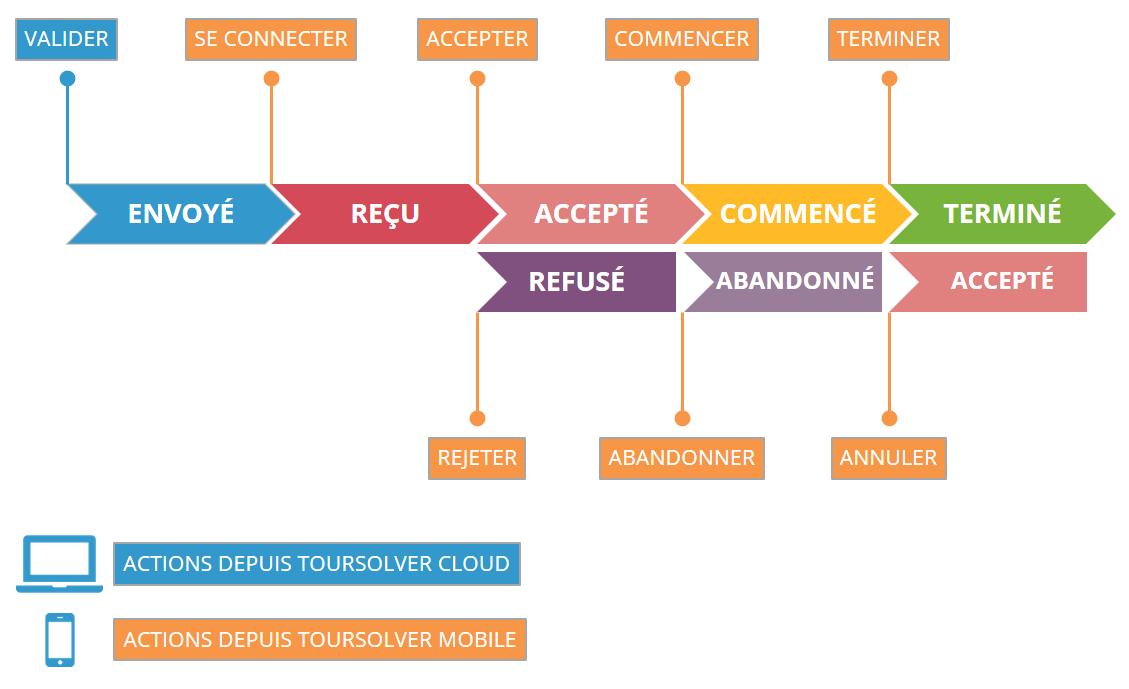
Here is a recap on possible actions and fulfilment statuses associated with visits:
Declining a visit
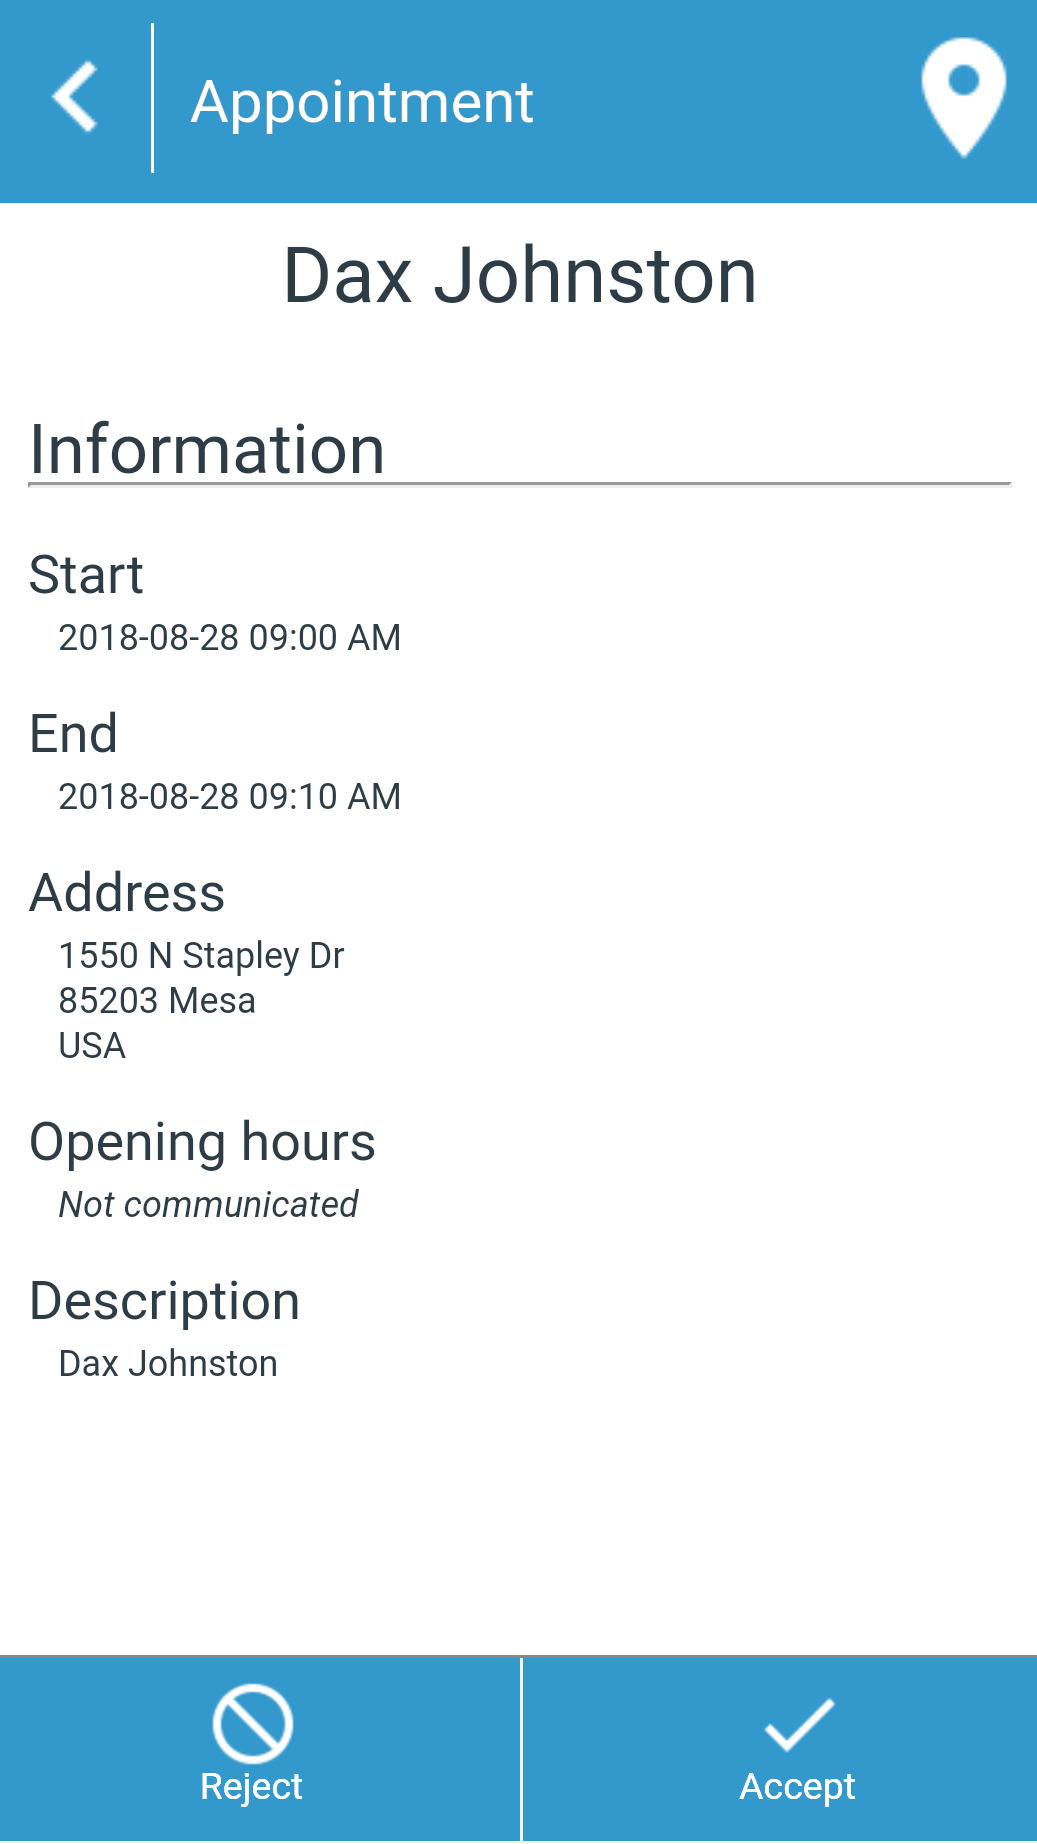
The user can allow or refuse a visit when they consult the visit form, using Reject or Accept as required.
- When this option is enabled, the user can Reject a visit. If the app user performs this action, they will be prompted to supply a reason for rejecting the visit. These information items will then be transmitted to TourSolver (visit status and reason for refusal).
- When this option is disabled, only the Accept action is possible from the visit form.
Give up accepted visits
It is possible to allow (or not) a visit to be abandoned by the app user when they consult the visit form. The Abandon action is an alternative to the Begin action.
- When this option is enabled, it is possible to Abandon a visit that was previously accepted. If applied by the app user, they will be requested to enter a reason for abandoning the visit. These information items will then be transmitted to TourSolver (visit status and reason for abandoning a visit).
- When this option is disabled, only the Begin action is possible from the visit form.

Fulfill visits in chronological order
You can force fulfilment of visits (or not) in their optimized chronological order. This means the user can fulfil visits (or not) out of order if required.
- When this option is enabled, visits can only be fulfilled in the chronological order suggested. This will mean that if the app user tries to start a visit while the previous one is not completed, this action will be refused.
- When this option is disabled, the user can fulfil visits as appropriate, rather than in chronological order.
Taking a customer signature
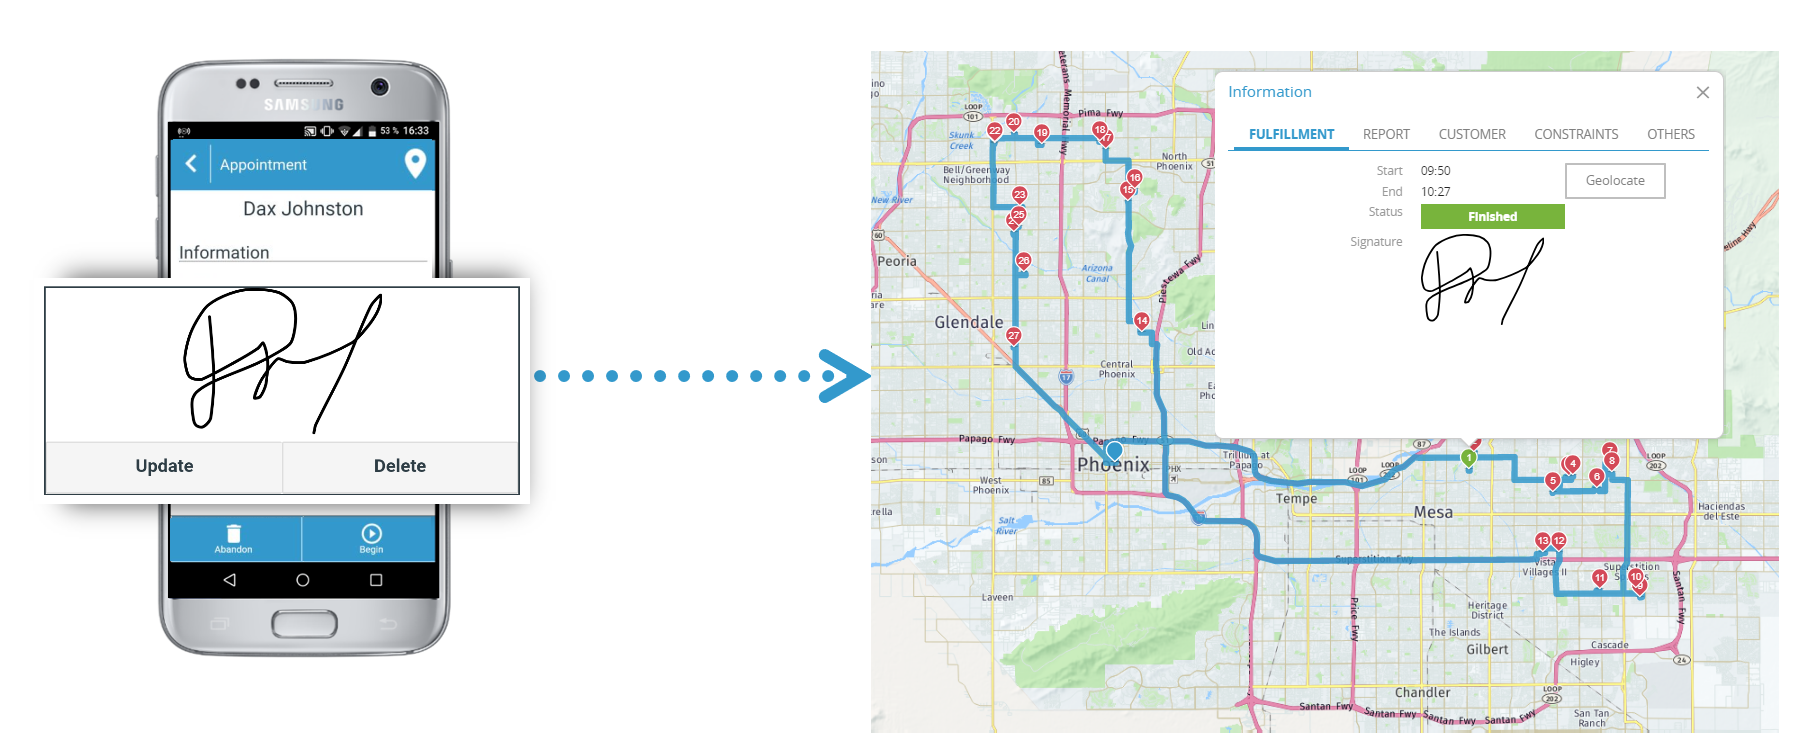
A customer signature can be entered in the visit form, during or after the visit. The user has the option to take a signature or not.
- When this option is enabled, one signature can be recorded per visit following the Begin action or after the Finish option. The signature can be entered or re-entered (updated) in the event of an input error. To find out more about taking a signature from the app consult the TourSolver mobile app Reference Guide.
- When this option is disabled, no signature can be taken.
Take photos for a visit
You can allow photos to be taken and inserted in the visit form during or following visit fulfilment. In this way, the user can take one or several photos, and either share them or store in the form.
- When this option is enabled, you can take and send one or several photos per visit, following a Begin action, or following a Finish action. Take one or several photos, and then select which to send to TourSolver in the interface. To find out more about taking photos via the app, consult the TourSolver mobile app Reference Guide.
- When this action is disabled, no photos can be taken.
Consult documents associated with the visits
When consulting a visit, the documents associated with it via the client page or the document library can be consulted by the mobile user. These documents can be in image (.jpg, .png) or document (.pdf, xls...) format.
Tracking
This section describes parameters related to tracking resources in the Fulfilment page map:
![]()
![]()
Tracking
The tracking service can be enabled or not for TourSolver mobile app users.
- When the service is enabled, the following settings are taken into account
- When the service is disabled the following settings are ignored
For more information about CNIL regulations applicable in France, consult the article about employee vehicle tracking.
Access to private mode
Private mode can be enabled or not in the TourSolver mobile app settings for the end user. When access to this function is allowed, the app mobile user can access an option to enable or disable this mode in the Settings page.
- When Private mode is enabled, tracking data are not communicated to TourSolver and the map in the Fulfilment page is not updated.
- When Private mode is disabled, tracking data is transmitted as defined in the following settings.
For more information about configuring Private mode, consult the TourSolver mobile app Reference Guide.
Access to customer repositionning
The function allows to activate the "Site" tab in the mobile app and thus to access the functionality of repositioning a client. This feature is useful when you use the client page. This function aims to reduce the impact of these risks during your next passes. A wrongly positioned address results in an inaccurate route plan and increases the distances actually covered by your colleagues in the field.

Geolocation data synchronization frequency
This parameter defines the frequency in minutes for automated retrieval of TourSolver mobile app user locations. This will only happen if:
- The tracking service is enabled
- Private mode is not enabled in the TourSolver mobile app parameters (refer to the TourSolver mobile app reference guide to find out how to enable/disable Private mode settings).
Days and times of activation
You can define dates and times tracking is activated. This means tracking is only enabled on dates and times specified in this window. Over and beyond these dates and times, tracking data is not collected and a warning message displays to this effect in the TourSolver mobile app.
Visit report
In this section, you can define any additional fields to display in the mobile app visit form, or to request to be filled in by the resource in a visit report. You can define:
- a series of fields so your visit form is customized for your business
- the type of each field to consult or to enter
- consultation, input, or mandatory input options according to the different life cycle phases for the current visit (before, during or after fulfilment)
Fields can be inherited from a visit import from a reference simulation, or created directly via this page.
Importing fields
The first button allows field import from a reference simulation. This means that if the visit file imported into a simulation contains fields that could usefully enrich the visit form in the mobile app, or the content of a visit report, one or more of these fields can be easily imported for their subsequent configuration to be viewed in the mobile app. Useful fields in the mobile app will have been configured as Other data when the fields are associated. Certain visit constraints can also be imported here.
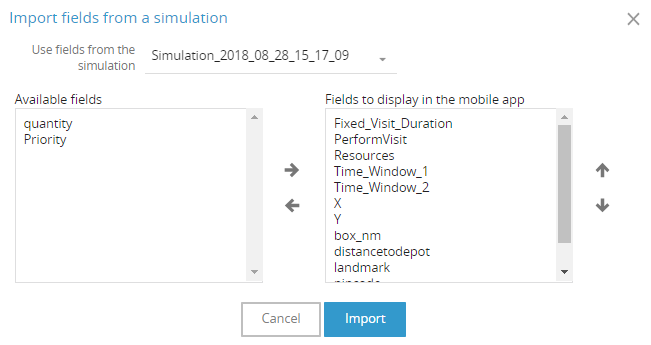
Click on the Import fields button to open a window offering a choice between:
- the reference simulation from which to import the fields AND
- the field(s) to import into the mobile app configuration
Once the simulation has been chosen, and the fields have been assigned, the Import button validates your choices and fills the list of fields to transmit to the mobile app. The Cancel button closes the window without saving any choices made.
Adding a field
The Add a field button serves to configure a new field when creating a personalised visit form.
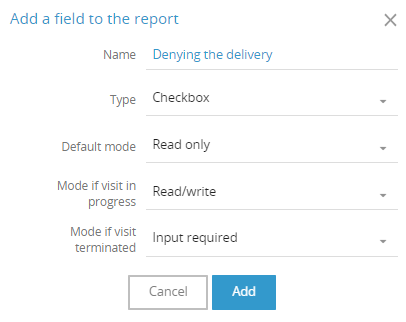
Click on Add a field to open a window allowing you to define:
- the name of the field, as it will be displayed in the mobile app interface
- the type of field chosen from one of the following: Checkbox, Text, Multi-line text, List of values, Number, Date
- possible values, in the case of List of values or Number type fields
- the default mode for accessing this field in the visit form from the mobile app: Read only, Read/write, Mandatory input
- the mode if the visit is under way, either Start or Finish, in the visit form from the mobile app: Read only, Read/write, Mandatory input
- the mode if the visit has finished, following the Finish action in the visit form from the mobile app: Read only, Read/write, Mandatory input
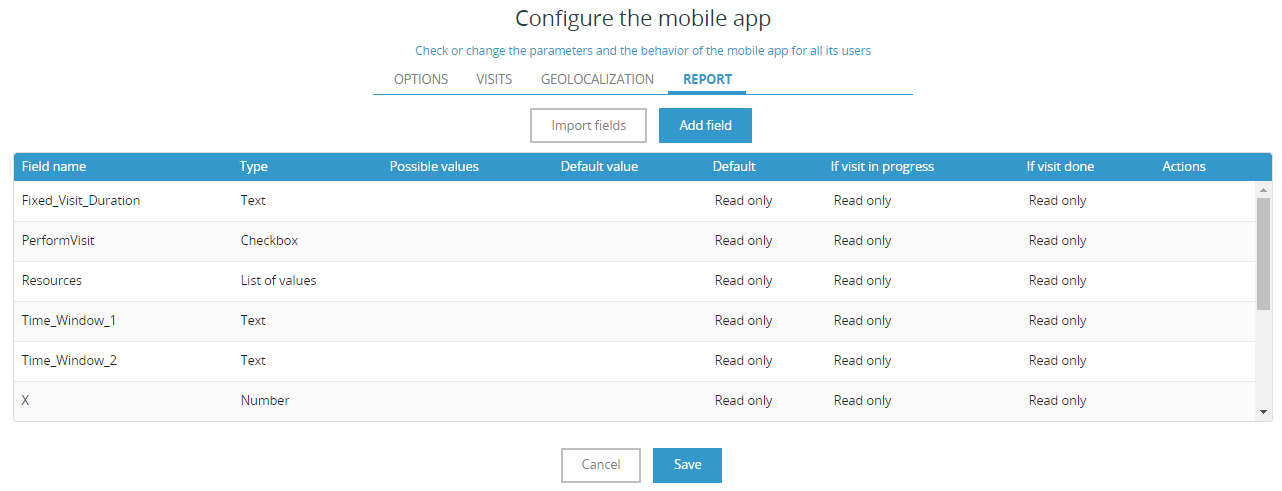
Editing a field
Click on a line in the list of fields in this section to open the configuration page and edit a parameter if required. Next, click on Edit to save the changes, or Cancel to ignore the changes.
At the end of your configuration of the mobile app, use Save to store all parameters defined. Use Cancel to ignore the changes made to the configuration and return to the last page displayed in TourSolver.
Happy TourSolving!
THESE ARTICLES MAY ALSO BE OF INTEREST:
> Reference guide of TourSolver mobile app