Configuration - User management
Shortcuts
>> See users
>> Track user activity in TourSolver
>> Create a new user
>>> What must the administrator do to create a user?
>>> What do users see after the administrator has created an access?
>>> Create a mobile user
>> Edit a user
>> Primary / secondary user
>> Administration
>> Dashboard and KPIs
>> Manage the scheduling
>> Manage the resources
>> Manage the depots
>> Fullfilment follow up
>> Customers
> Users importation/ exportation
>> Definition
>> View & edit organizations
>> Assignment of organization
Basic principles
As a new TourSolver administrator, you are in charge of user management. You will create and modify users, assign roles, configure data access and much more!
In this unit, we will see:
- What users are, how to add them to your TourSolver account.
- We will list the existing roles in TourSolver, their prerequisites to use them and the rights they give to users.
- We will finish by looking at how to partition the company's data using Organizations.
Utilisation
Generalities
Before you learn more about the subject, it is important to know that all the functionality described below is only available with the level. If you are interested in the feature, please contact us via the > > Contact page.
What is a user? A user is any person who logs into TourSolver or TourSolver Mobile. A user can be an employee of your company such as a salesperson, logistician, manager, or an IT person who wants to access TourSolver data. It can also be a subcontractor.
== Back to the table of contents ==
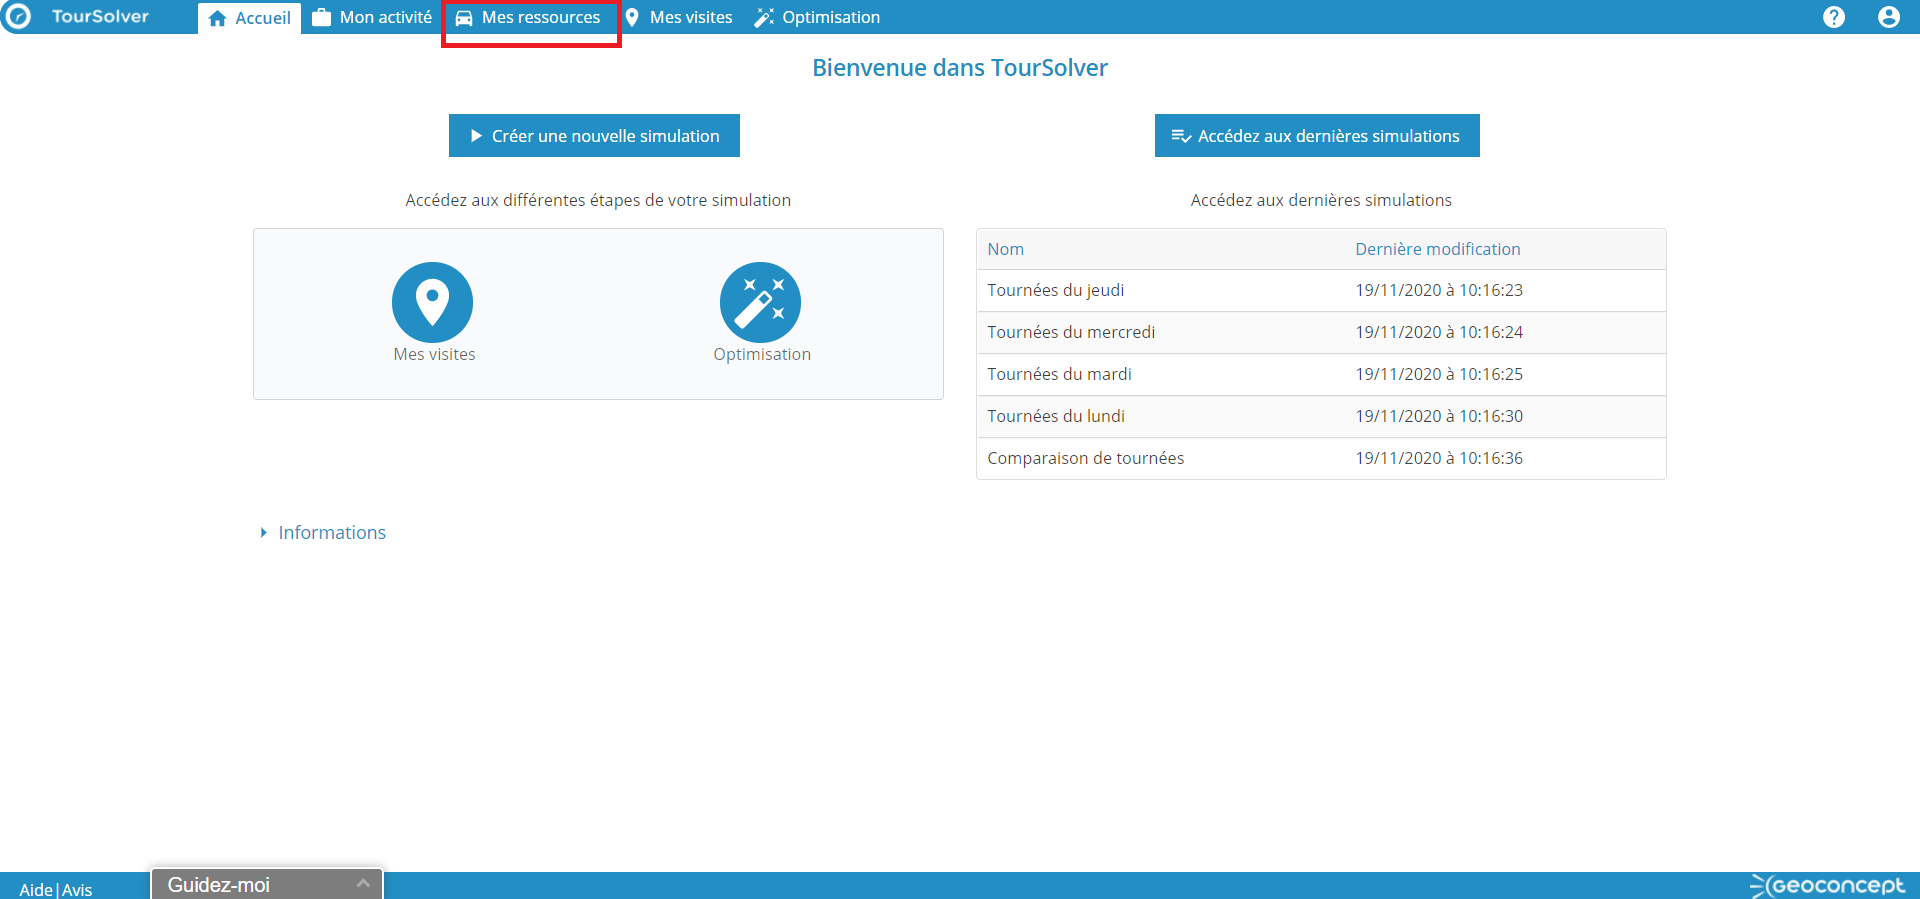
Manage users
To manage users, you need to access to the Confiuration, and click on the button. By default only administrators can access the user management. If you do not see this button, contact the TourSolver administrator to get the correct role.
See users
By default, it is composed of the following 6 columns:
- Login
- First name
- Last Name
- Last login
- Roles. The assigned roles are listed here
- Phone number. When a Mobile role has been assigned the phone number can be listed.
This information allows you to have a view of the users currently entered in the application. It is possible to search for them via the filter in the upper part of the screen.
Track user activity in TourSolver
TourSolver allows you to track the activity of your users, such as whether they log in regularly, whether they are active and how many optimizations they run. To view such information, click on the Actions button, then Customize the list, and load the data you are interested in.

The additional columns are 11 in number, they include:
- Enabled: if the value is Yes, the user has access to TourSolver, otherwise he can't connect to the application.
- Number of connections: cumulative number of connections since the first activation of the account
- Login over 7 days: cumulative number of logins in the last 7 days
- Connection over 31 days: cumulative number of connections in the last 31 days
- Number of optimization: cumulative number of optimization launched from the visits, client or optimization pages
- Number of manual optimization: cumulated number of clicks on the "Manual optimization" button of the visit and customer pages
- Cumulative visits: cumulative number of imported visits
- Visits sent to mobile app: number of visits shared on the mobile app (from the optimization page) by the planner.
- Refused visis: Number of visits refused by the mobile user. Note the refused status is a status that can be activated from the settings of the mobile app.
- Canceled visits: Number of visits canceled by the mobile user. Note the refused status is a status that can be activated from the settings of the mobile app.
- Completed visits: number of visits completed by the mobile user
This information can then be exported for sharing, or for making statistical reports on the level of use of TourSolver. To do this, first select the users whose data you want to retrieve, then click on Actions and Export. An Excel file is generated, which contains the list of selected users and the columns that are present in the table after the customization.
Create a new user
What must the administrator do to create a user?
To add a new user, there are two possibilities: you can go directly to the button Actions then Import then create users in mass, or you can click on Action then Add, the form of the user to be filled appears then on the screen. The following information must be entered:
- Login or e-mail address
- User's first name
- User name
Here is some information that may help you enter this form:
- The email address must be entered in lower case and must contain the "@" symbol to be accepted.
- When creating a user, by default, the "Active" status is set to "Yes". This means that the user can log into their TourSolver account.
- You must fill in at least one role to create the user.
By clicking on the button you confirm the creation of the account. An email is sent to the account holder when the user has been activated. The email informs him that an account has been assigned to him, and invites him to set up his password.
The reception time may vary depending on your email management rules. In some cases the user may receive the email several minutes after it is sent. You can find out if a user has logged in for the first time by observing the value of the Last connexion field. If this field is filled with a date and time, it confirms that the user has logged in to TourSolver.
If the email was not sent or was accidentally deleted by a user, it is possible to resend an invitation by clicking on Action then
What do users see after the administrator has created an access?
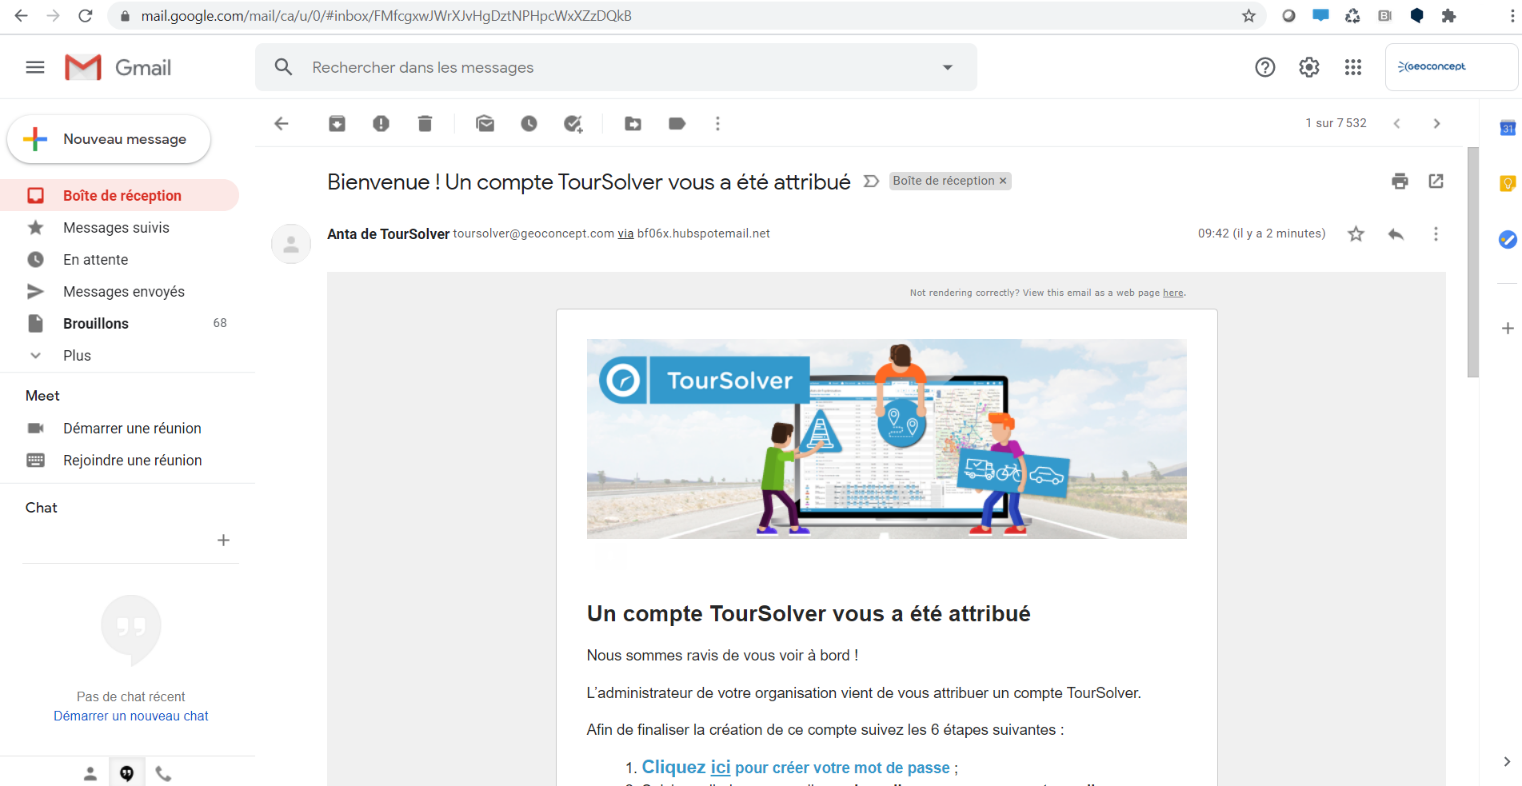
When an administrator creates your account, you will receive a welcome email. It tells you that an account has been assigned to you and prompts you to create your new password.
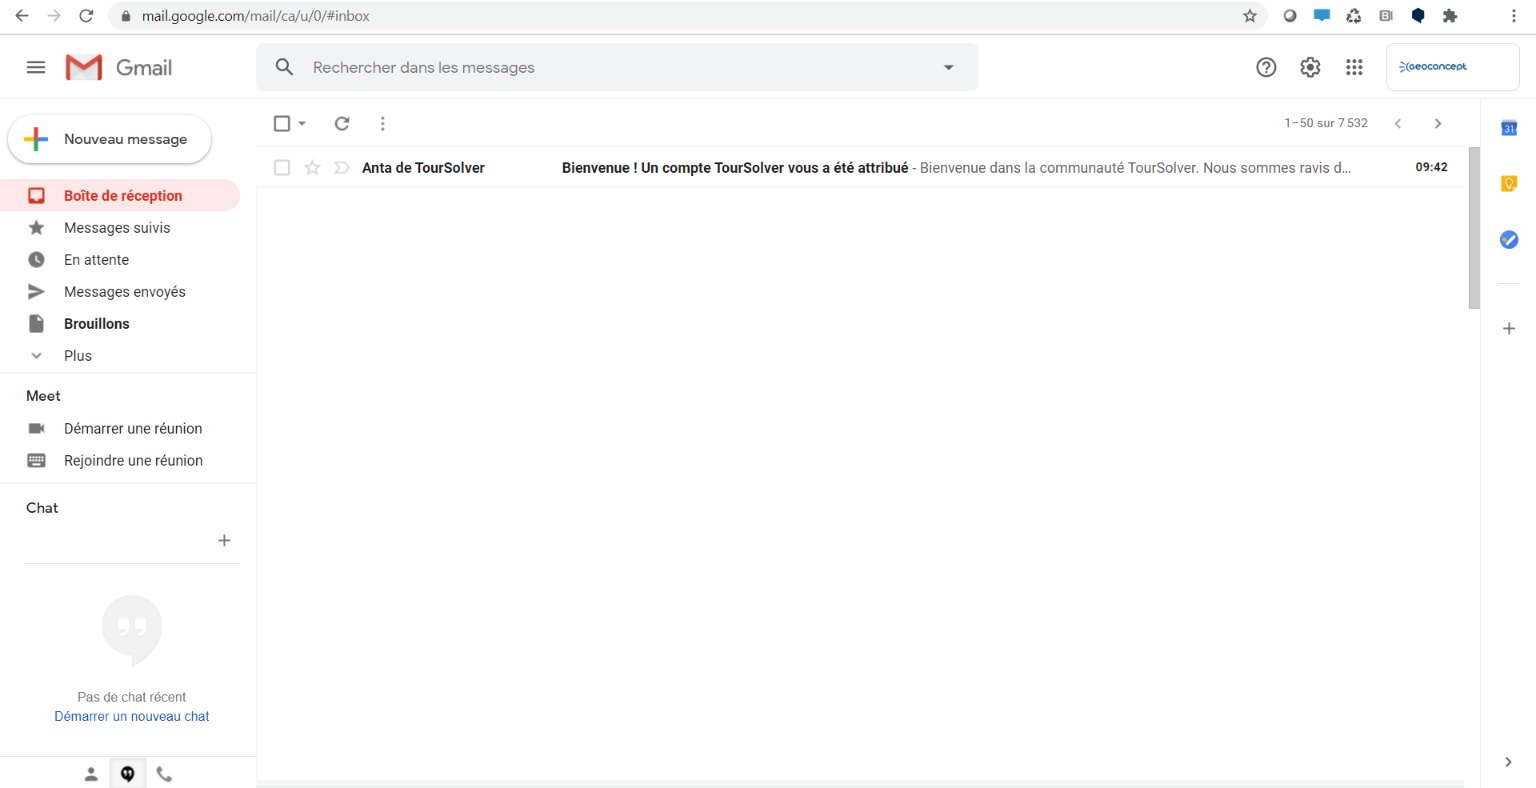
When you open the email you will see short instructions, which you should follow in order to validate the assignment and change your password.
Create a mobile user
For your users to have access to TourSolver mobile, you (the administrator) must create a mobile user.
If you want to create a mobile user, you will have to create a user by assigning him the Mobile role. The password must be entered by the administrator and cannot be changed by the user.
It is not necessary to assign other roles to this user if he uses only the mobile app.
It is possible to link TourSolver's authentication mode with yours via an SSO connection. If you are interested, contact your consultant or your sales representative.
Edit a user
As an administrator, as you use TourSolver, you may want to deactivate an account or change assignments (role or organization). Here's how to do it:
From Configuration optio,, by clicking on the, a page loads and the list of users appears.
To modify the characteristics of a user, select the line of the target user and click on Edit, the user's form will appear on the screen. You can then:
- Activate or deactivate a user. A disabled user will no longer be able to log in to TourSolver with a license level that allows him/her to access the data.
- Modify roles.
- Assign organizations.
Primary / secondary user
In TourSolver there are two types of users, the primary user and the secondary user.
The main user is the reference user of your company, a kind of "Super Administrator". It is designated at the creation of TourSolver accesses when the order is taken and assigned in concert with you by the Nomadia sales department. This account has some particular characteristics:
- By default, he has all the roles (except the mobile role),
- It is not possible for a user (even an "administrator") to remove the administration right or even to delete it.
Therefore, if you are an administrator AND a secondary user yourself, don't be surprised if you can't change the admin role or even remove it from a particular account! It is certainly the primary user!
Secondary users can hold an administrative role, but they cannot delete a primary user or remove their administrative role.
If you wish to reassign the main user to another user because the holder has or will leave the company, you should contact the Nomadia sales department, which will help you carry out the operation.
== Back to the table of contents ==
Roles
In TourSolver when creating users it is possible to assign predefined roles. These roles are cumulative. Thus, to have all edition rights, it will be necessary to select all roles (except the "mobile" role which is optional).
List of roles
Below is a description of the roles and their prerequisites
Click on the links to go to the sections that interest you.
- Administration
- Manage the scheduling
- Manage the resources
- Manage the depots
- Fullfilment follow up
- Customers
Administration
Description
The administration role is assigned or deassigned by an administrator or a Super Administrator. The Super Administrator (primary user) cannot lose this role, unless he becomes a secondary user (see: Primary / Secondary User).
View of an account with only the "Administration" role enabled
Requirements
To use this role you must:
- Be a primary user (who by default has the administration role)
- Or have been given the Administration role by a user who already has this role.
Allows to :
-
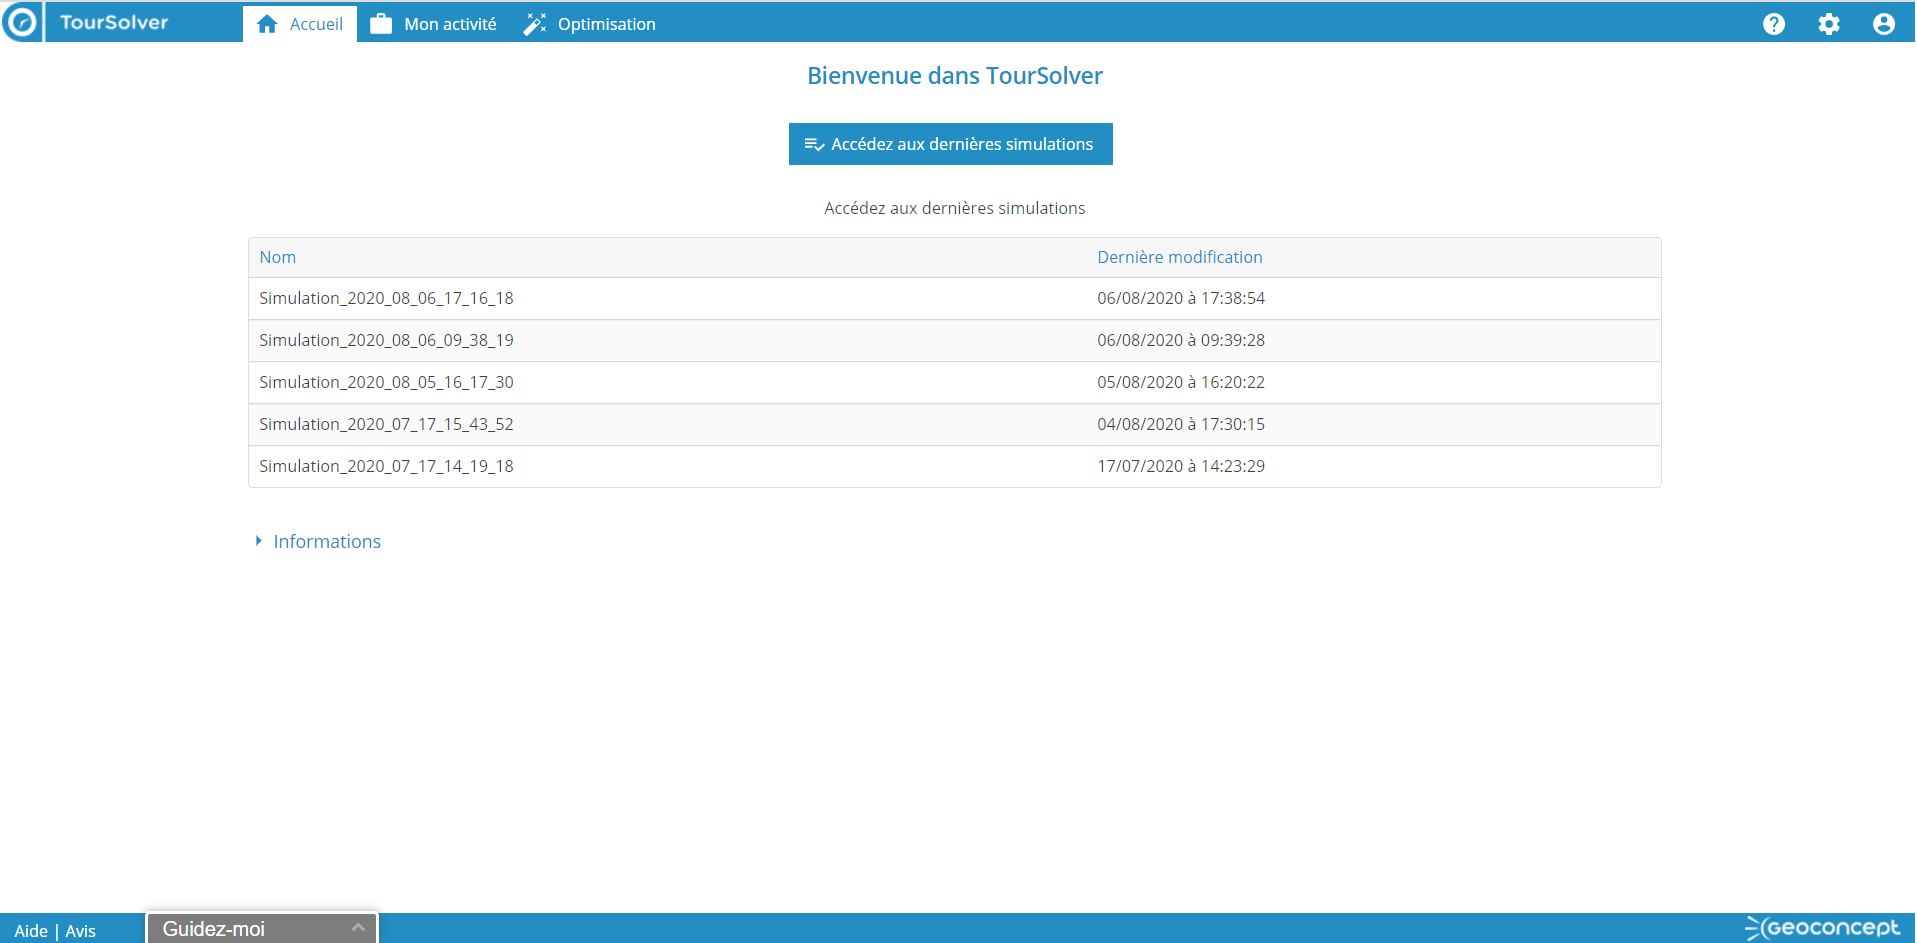
View and modify your simulations:
- It is possible to access the list of all your simulations and to: delete, duplicate, compare, extend the conservation etc..
- It is possible to open one of your simulations to see the details, but without being able to modify the schedule. (for this it is necessary to activate the role Planning)
- View and modify the settings of the "Configuration" page, including the management of users, roles and organizations
-
It allows you to access the advanced configuration features, i.e. the settings of :
- mobile app
- SMS
- Customer experience page
- WebFleet Solutions
- Webhook
Dashboard and KPIs
Description
The dashboard and KPIs role is assigned or deassigned by an administrator or a Super Administrator.
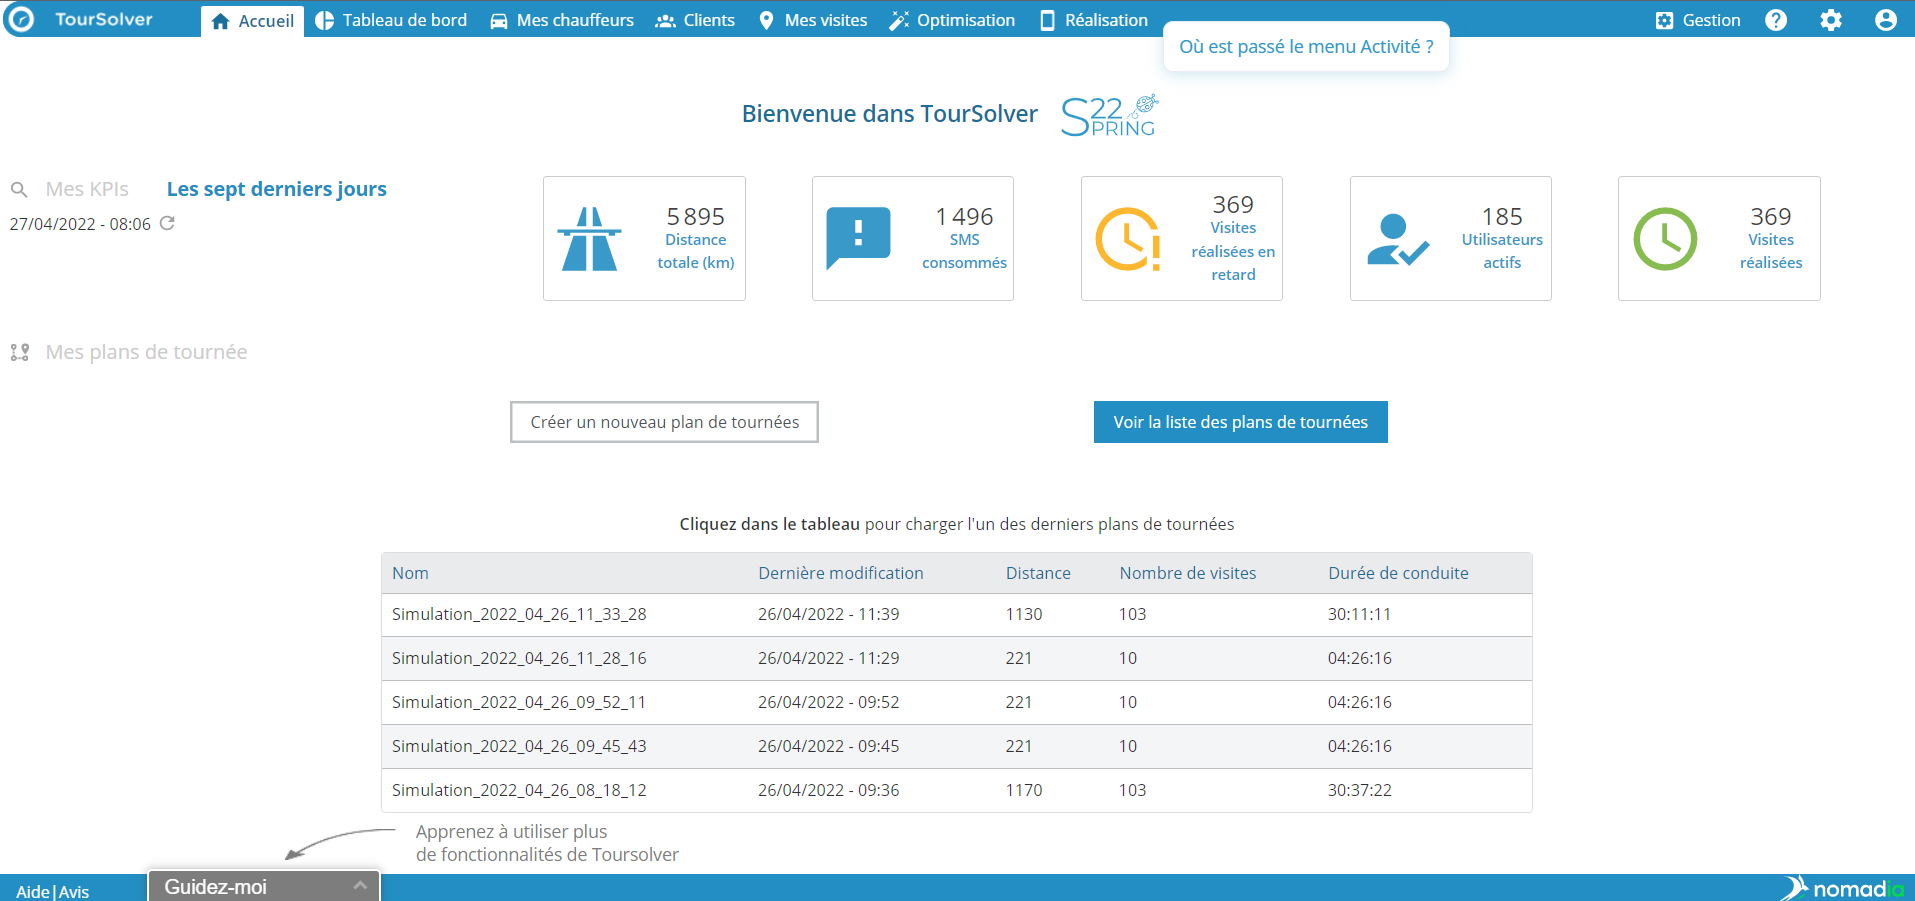
View of an account with the "Dashboard and KPIs" role enabled
Requirements
To use this role you must:
- Be a primary user (who by default has the administration role)
- Or have been given the Administration role by a user who already has this role.
Allows to :
- View the Dashboard page
- Configure and view KPIs on the Hompe page.
Manage the scheduling
Description
The "Manage the scheduling" role is certainly the most central in TourSolver because it allows you to do the work of planning the activity without worrying about the administration of the most advanced functions.
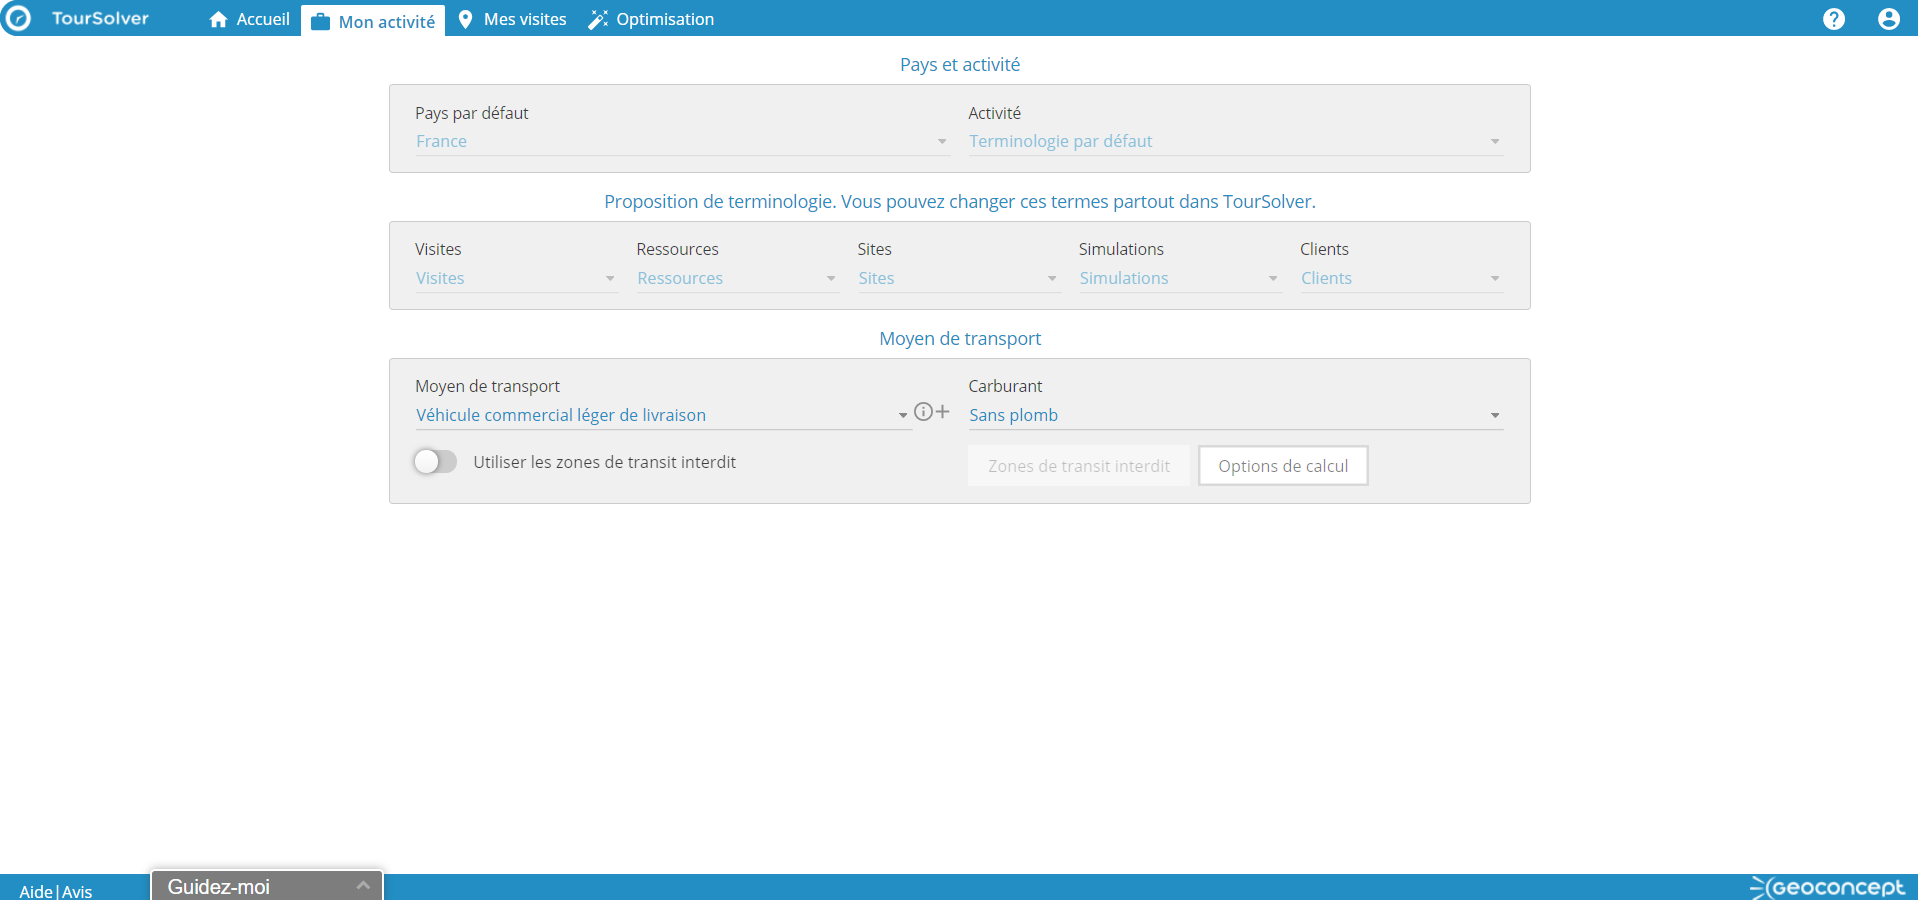
View of an account with only the "Planning" role enabled
Requirements
To use this role you must:
- Have been assigned the "Manage the scheduling" role by a user with the Administration role.
Allows to:
- View and modify your simulations
-
View and modify the parameters of the "Configuration" page except the parameters related to
- Users
- Organizations
- Depots (for this it is necessary to activate the role "Manage depot")
- Terminology
- Create simulations and run optimizations
- Import visits
- Publish scheduled visits in the mobile application
Change the mappings
This role can only be activated with the "Manage scheduling" role.
If it is activated, it allows the user with this right to modify the field associations made by default when importing data. Otherwise he inherits those of the administrator.
Description
The role View other people's simulations gives access to the list of all the simulations of the different users. It is then possible to open a simulation to see its details, but without being able to modify the planning (for this, it is necessary to activate the role Planning).
view of an account with the "View others' simulations" role
Requirements
- Have been assigned the role View simulations of others by a user with the role Administration.
- The role must be enabled with at least one of the following 4 roles: Administration, Planning, Realization or Mobile.
Allows to:
- View the simulations of others in Show all simulations and open them to see them in detail, without being able to modify them (for this it is necessary to activate the Schedule role).
Edit simulations of others
Description
The role Edit other people's simulations allows access to the list of other users' simulations, in order to delete, duplicate, compare, extend retention, etc.
view of an account with the "Edit others' simulations" role
Requirements
- Have been assigned the role Edit simulations of others by a user with the role Administration.
- The role must be activated with at least one of the following 4 roles: Administration, Planning, Execution or Mobile.
Allows to:
- Modify other people's simulations in Show all simulations and be able to delete them, duplicate, compare, extend storage, etc...
Modify optimization settings
Description
It allows to hide or activate the optimization settings button for some users.
Requirements
It is necessary to have the right to access the optimization page. So you must have the role "Schedule" to activate.
Allows to:
- See the optimization settings
- Create optimization settings
- Edit optimization settings
Description
This role allows you to activate the "My resources" page (the term may be different for you depending on the terminology you have chosen), and thus create or edit your resources for optimization.
View of an account with only the "Manage scheduling" & "Resource management" roles enabled
Requirements
To use this role you must:
- Have been assigned the Manage Resources role by a user with the Administration role.
Allows to:
- View, create and edit resources from the "My Resources" page
Remarks: It is necessarily associated with the "planning" role and its rights
Manage the depot
Description
This role allows you to access the "depot" page (the term may be different for you depending on the terminology you have chosen), and thus create or edit depots.
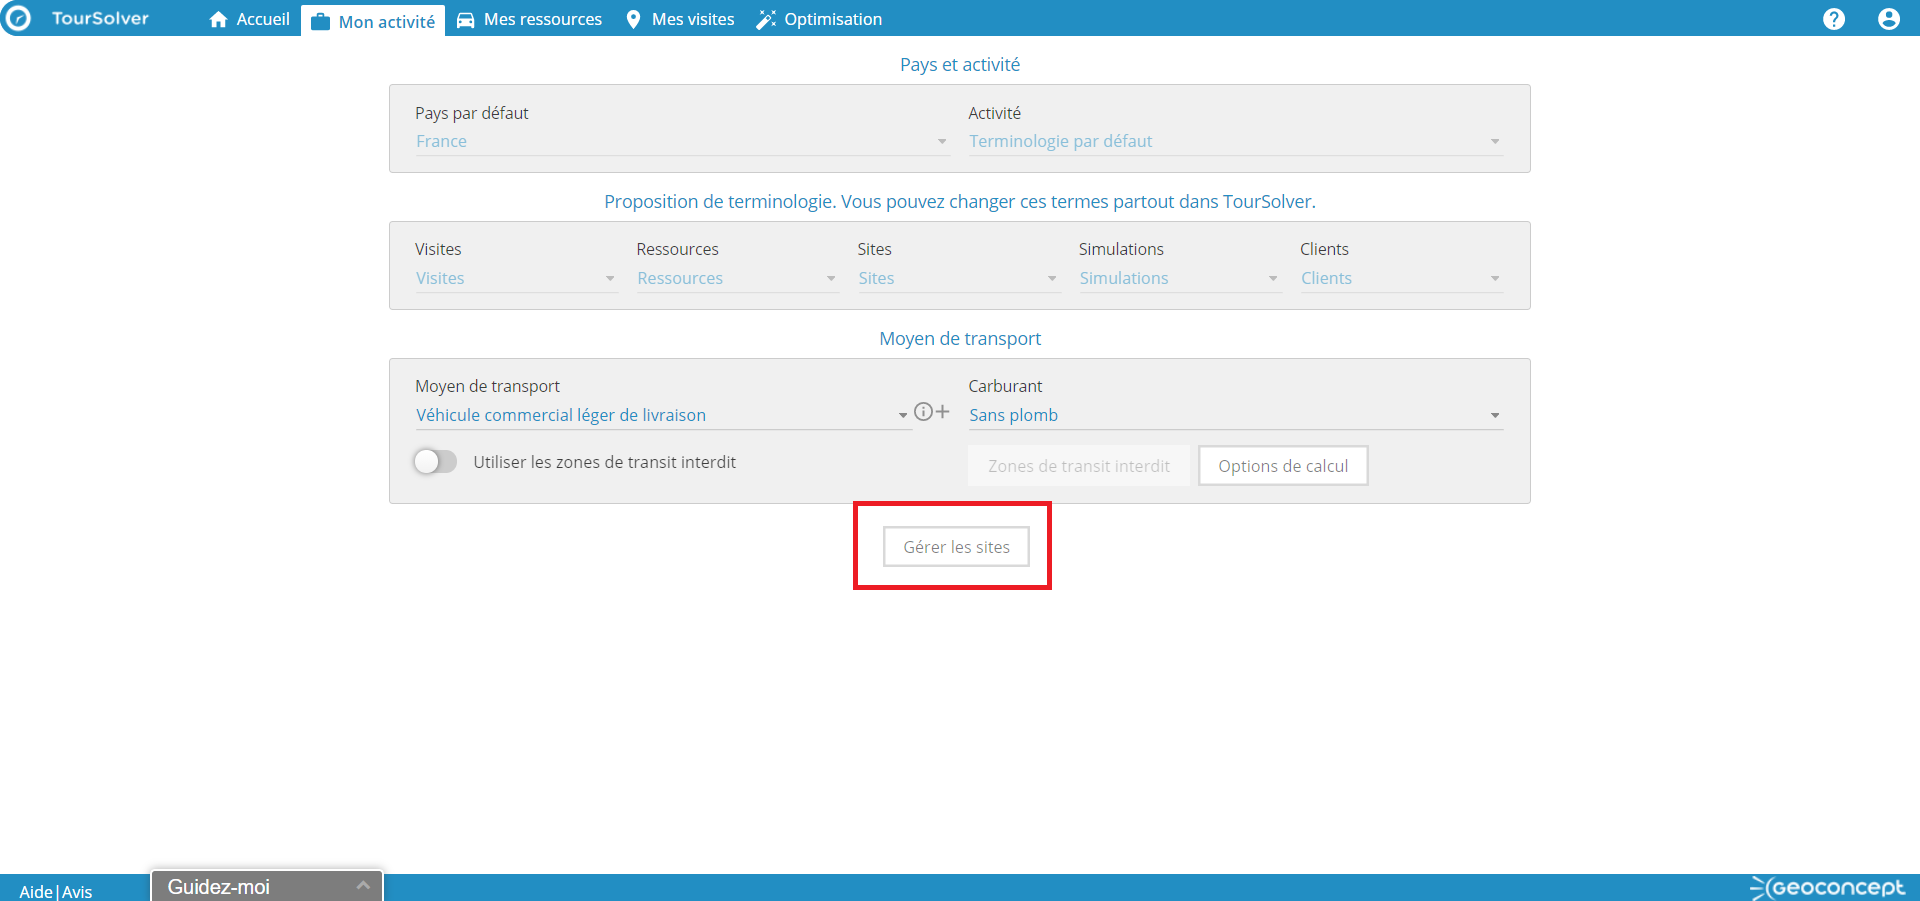
View of an account with only the "Manage the scheduling" & "Manage the depot" roles enabled
Requirements
To use this role you must:
- Have been given the "Manage the depots" role by a user with the Administration role.
Allows to:
- View, create and modify depots from the "Configuration" page
Remarks: It is necessarily associated with the "planning" role and its rights.
Fulfillment
Fulfillment follow up
Description
The fulfillment role is useful when using the TourSolver Mobile app, as it allows you to track resources activity in real time.
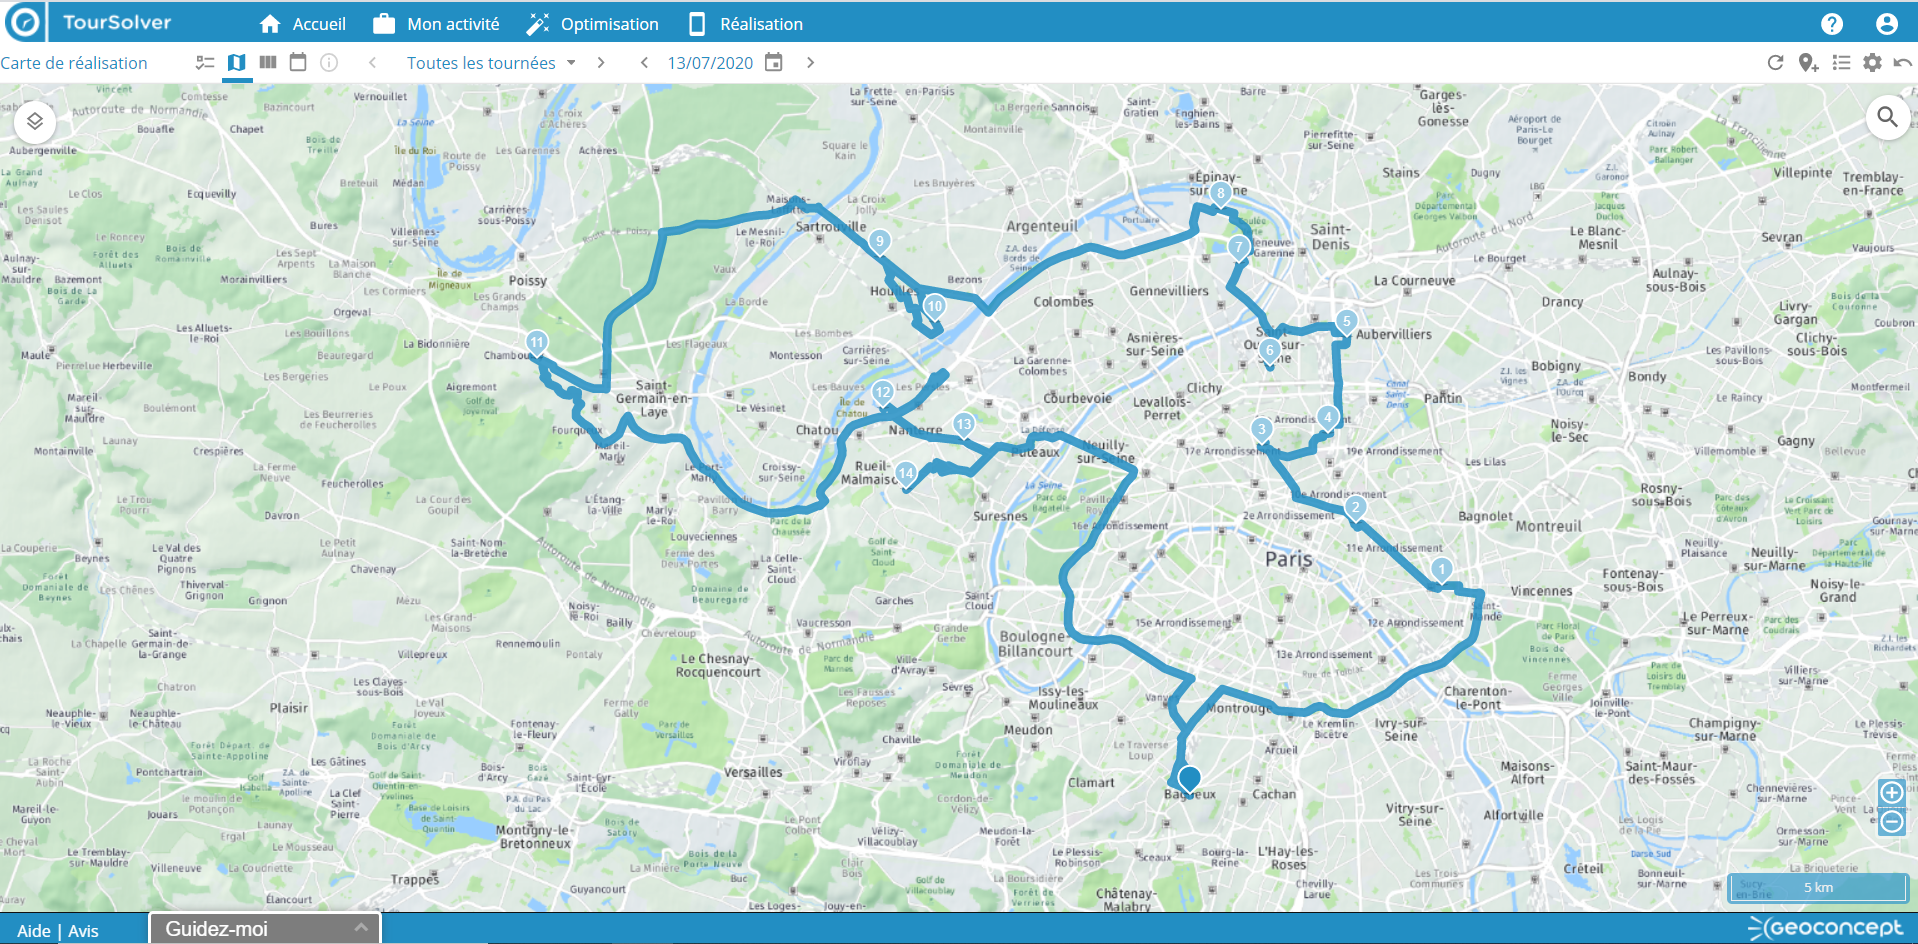
View of an account with only the "Fulfillment" role activated
Requirements
Have been assigned the Fulfillment role by a user with the Administration role.
Allows to:
- See its simulations
-
Follow up the realization, that is to say :
- See the GPS trace of the vehicles on the map,
- See the modifications in real time of the visit statuses,
- Follow the planning of realization minute by minute,
- See the history of realization, and the comparison with the planned.
See the planning of others
This role can only be activated in combination with the "Fulfillment follow-up" role.
If it is activated, it allows to see the schedule of other users in the "Fulfillment" page.
Clients
Customers list
Description
The Client List role allows you to view the client repository without updating it.
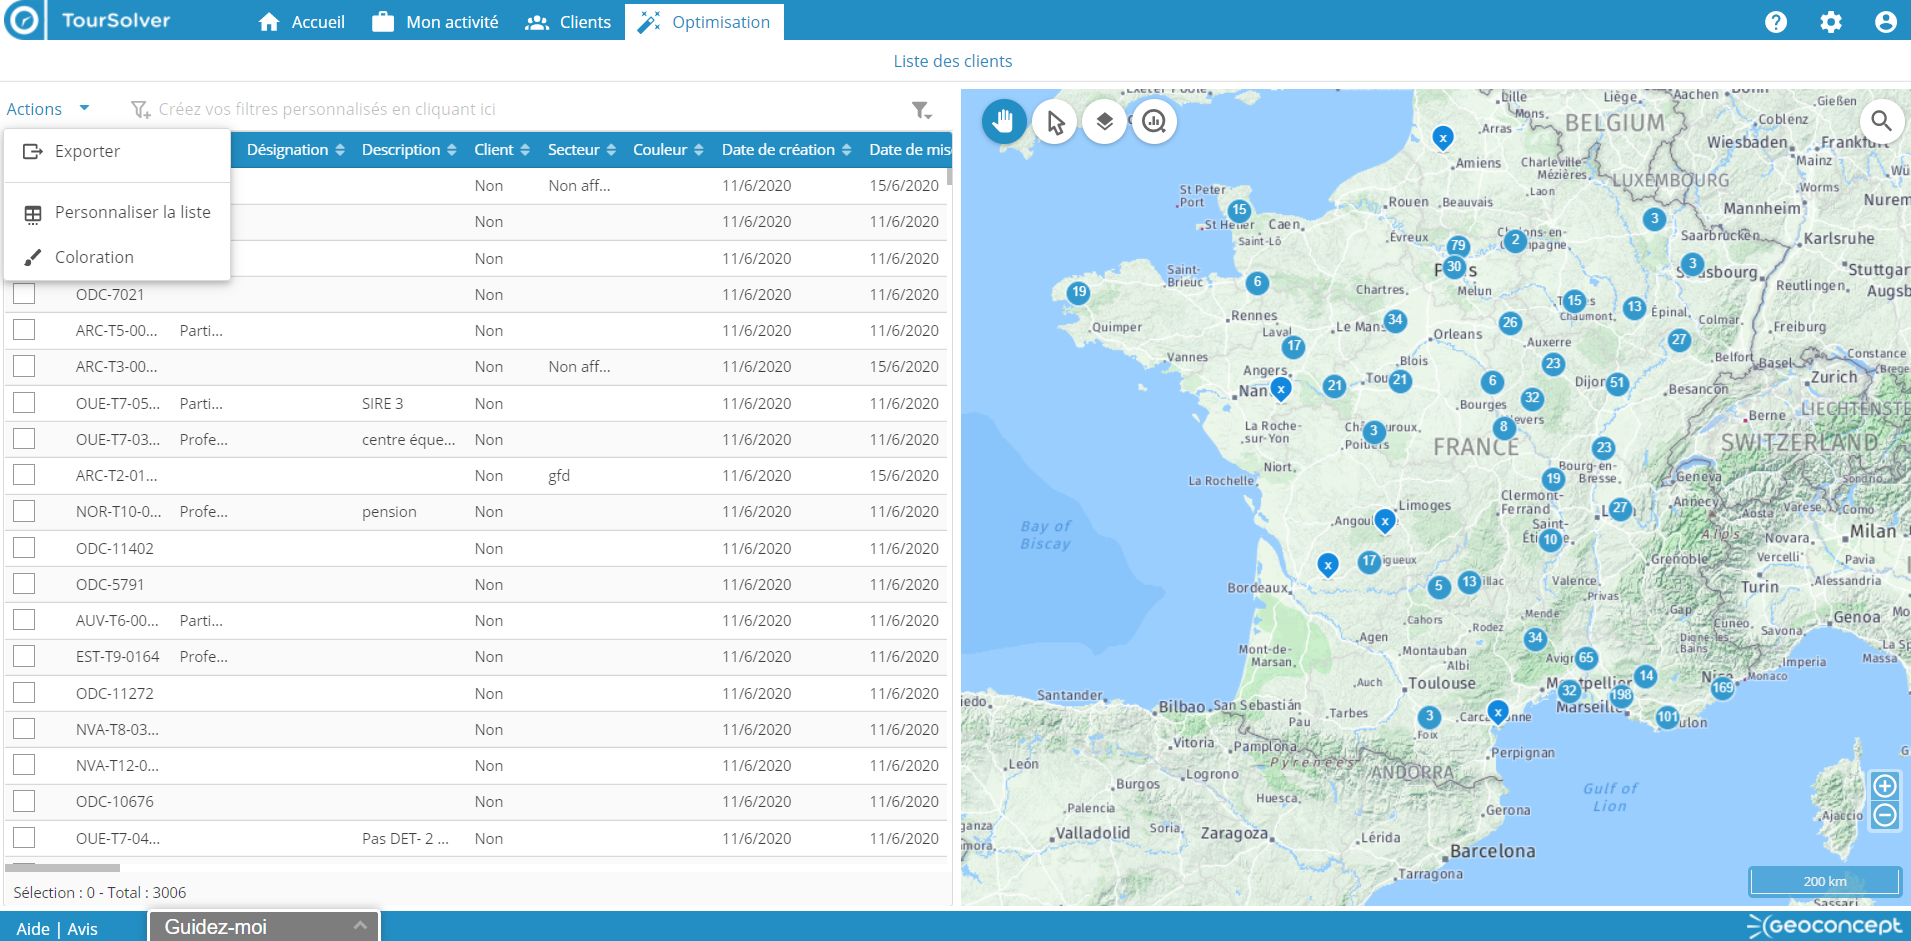
View of an account with only the "administration" & "customer list" roles enabled
Requirements
- Have been assigned the Client List role by a user with the Administration role.
- The role must be enabled in addition to one of the following 4 roles: Administration, Planning, Implementation or Mobile.
- If he wants to see and modify the client page, the user receiving the role must activate this page himself. This can be done from the user preferences (see image below or this link)
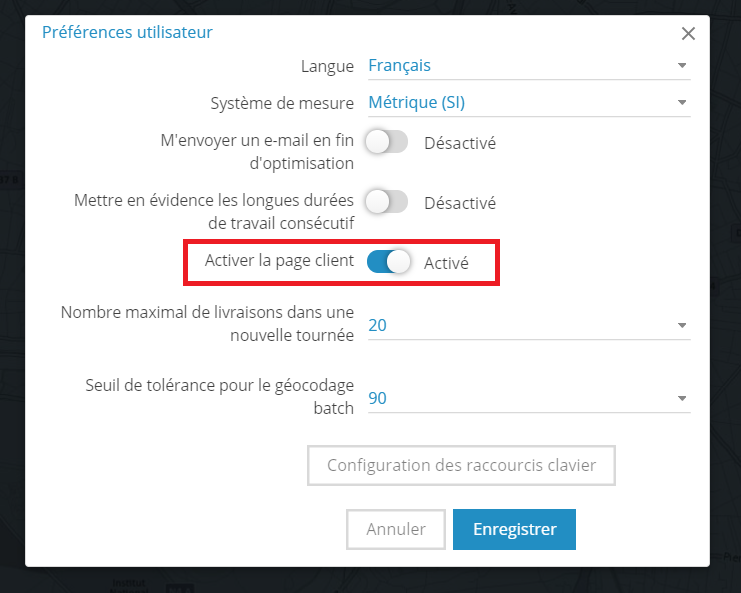
View of the preference settings screen
Allows to:
- View the client database
- Export the client database
Description
The Customer Modification role allows you to edit (import or modify) the client database.
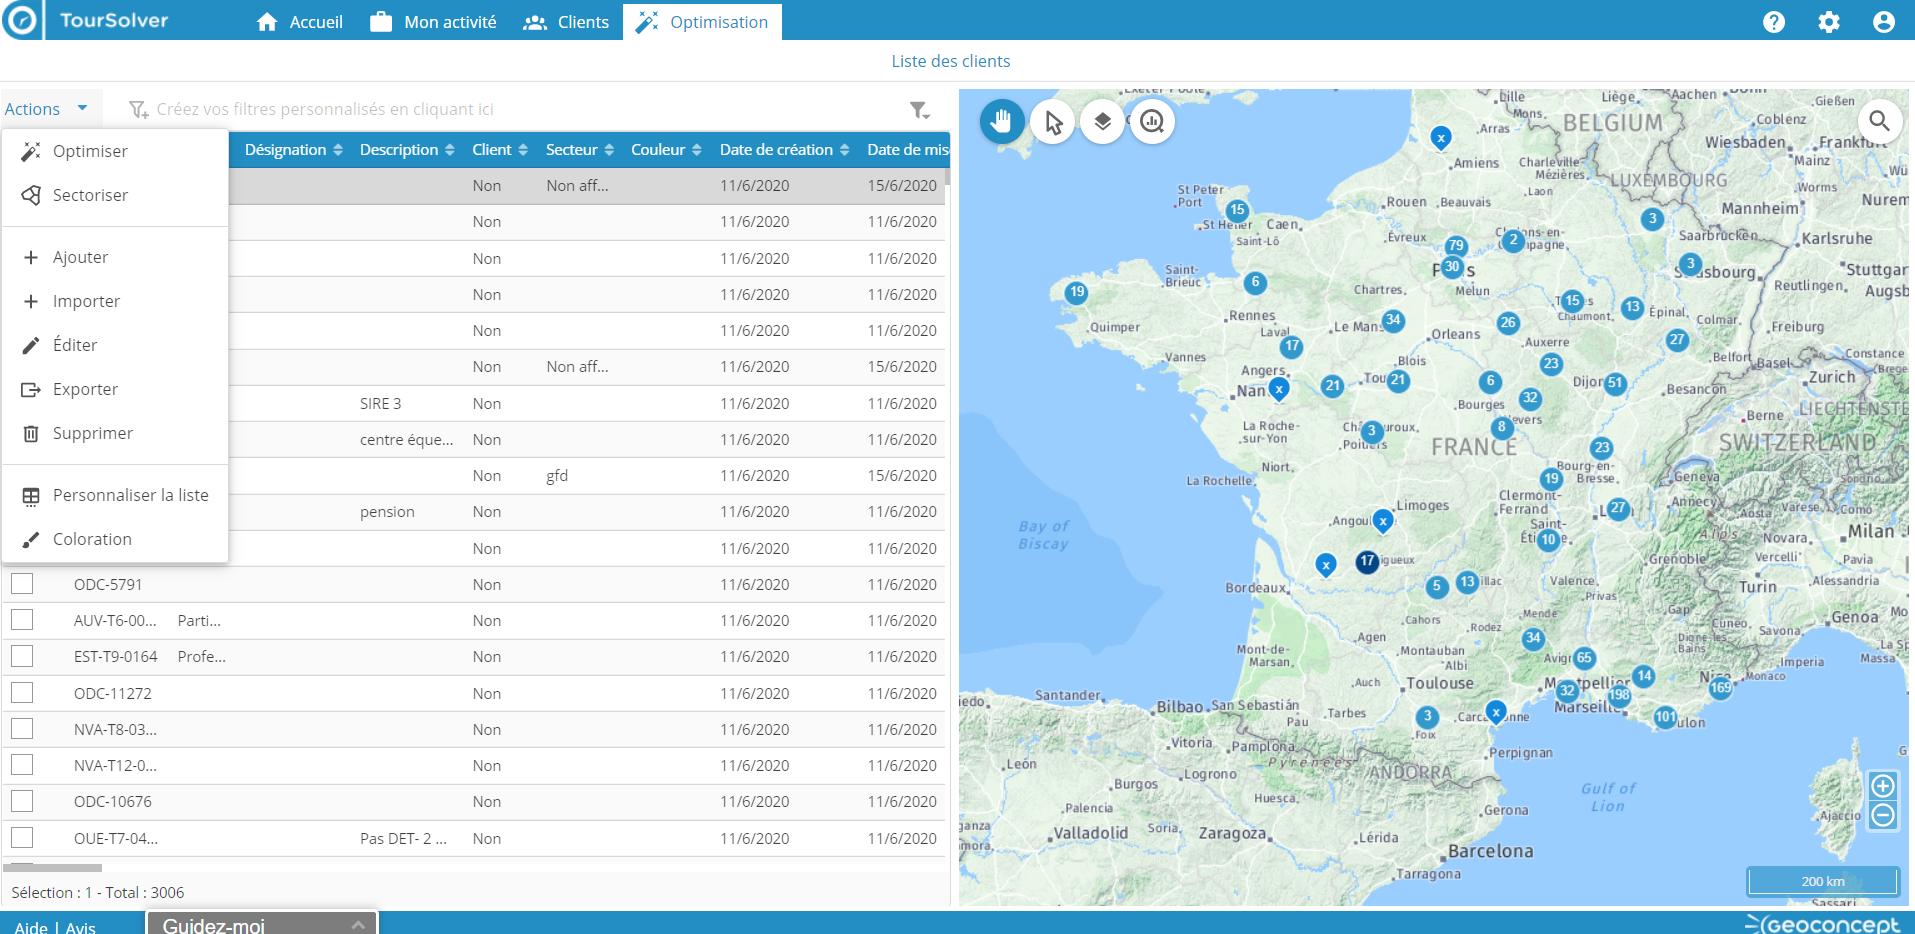
View of an account with the roles "administration" / "customer list" / "customer modification" activated
Requirements
- Have been assigned the role Client Modification by a user with the role Administration.
- The role must be enabled with at least one of the following 4 roles: Administration, Manage the scheduling, Fulfillment or Mobile.
- The Client List role must also be assigned.
- If he wants to see and modify the client page, the user receiving the role must activate this page himself. This can be done from the user preferences (see image below or this link)
Vue de l'écran de paramétrage des préférences
Allows to:
- Modify the database (individually)
- Delete elements from the database
Import customers
Description
The Import Clients role provides access to the Client Repository Import page.
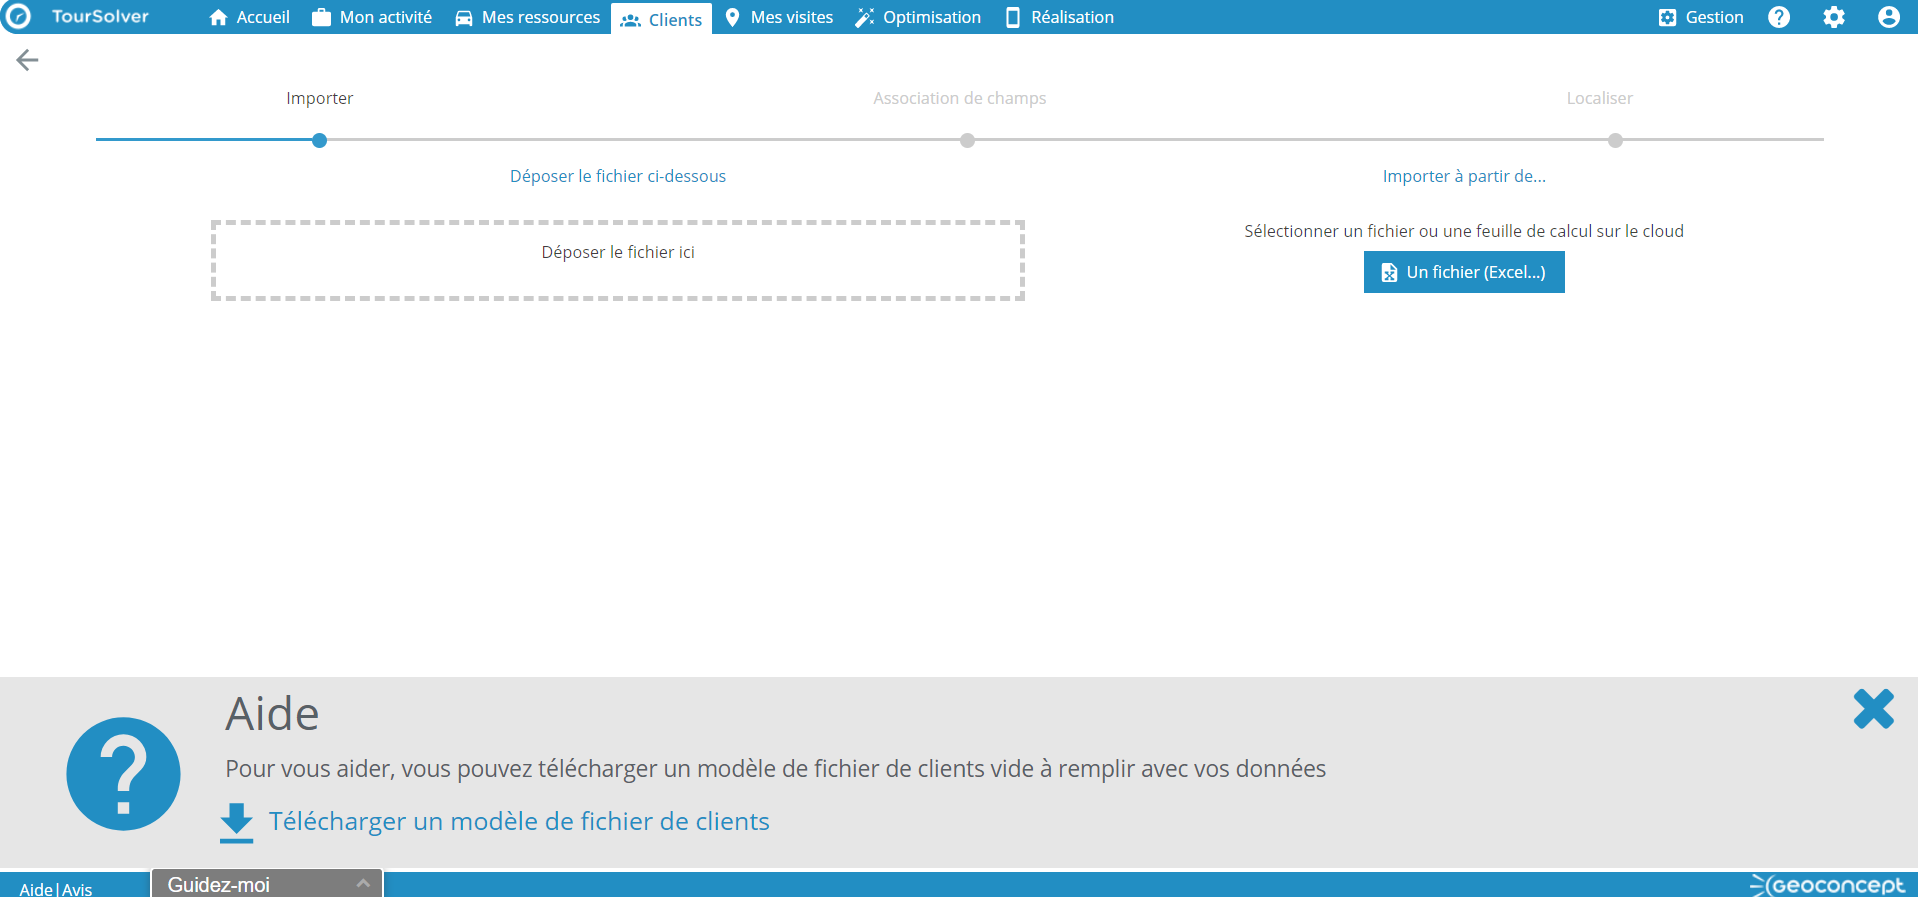
view of an account with the "Import clients" role
Requirements
- Have been assigned the Import Clients role by a user with the Administration role.
- The role must be enabled with at least one of the following 4 roles: Administration, Manage the scheduling, Fulfillment or Mobile.
- The Client List role must also be assigned.
- If he wants to see and modify the client page, the user receiving the role must activate this page himself. This can be done from the user preferences (see image below or this link)
Allows to:
- Import clients
- Batch update clients via the import function
== Back to the table of contents ==
Import / Export users
From the Actions drop-down list, it is possible to import and export the list of users. By clicking on Import, you will be able to download a file template.
Tip: It may also be convenient to create a user manually, then export it, so you get the role names as they should be imported into TourSolver.
== Back to the table of contents ==
Organizations
Definition
Organizations allow you to filter work data to hide certain data from users with the same role. You can use them to filter by Business Unit or by geographical region. Here are some examples of possible applications:
- As an administrator, I want the customers in my database to be visible to "sales breeders" while all the prospects in my database are visible to "sales hunters".
- As an administrator I would like the clients of the North branch to be visible only to the controllers of the North branch, etc...
It allows to
> Secure your company's data and its uses. Non-visible data is data that cannot be accidentally modified.
> Show the data directly useful to the users of the application, without polluting them with elements that do not concern them.
> Manage license allocation. You can see how many resources have been created per organization and optimize their allocation
View & edit organizations
To see the list of organizations, you must first have the right to do so! Indeed, only users with the administration role can access it.
If you are authorized, then go to the Configuration page, and click on the button.
A page loads and a table listing the organizations created in TourSolver appears. It is composed of the following 8 columns:
- Identifier
- Name
- Address
- Zip code
- City
- Country
- Used resources: indicates the number of resources actually created by users in each organization.
- Max number of resources: allows you to allocate a maximum number of resources that can be used in the organization in order to optimize your license capital. If a user tries to create a resource that exceeds the threshold a message will be displayed telling him that it is not possible:
To add a new organization, you can click on Action then Add, the form of the organization to be filled appears on the screen. It will be necessary to create an address.
If you want to modify it, you must select it and click on Action then Edit.
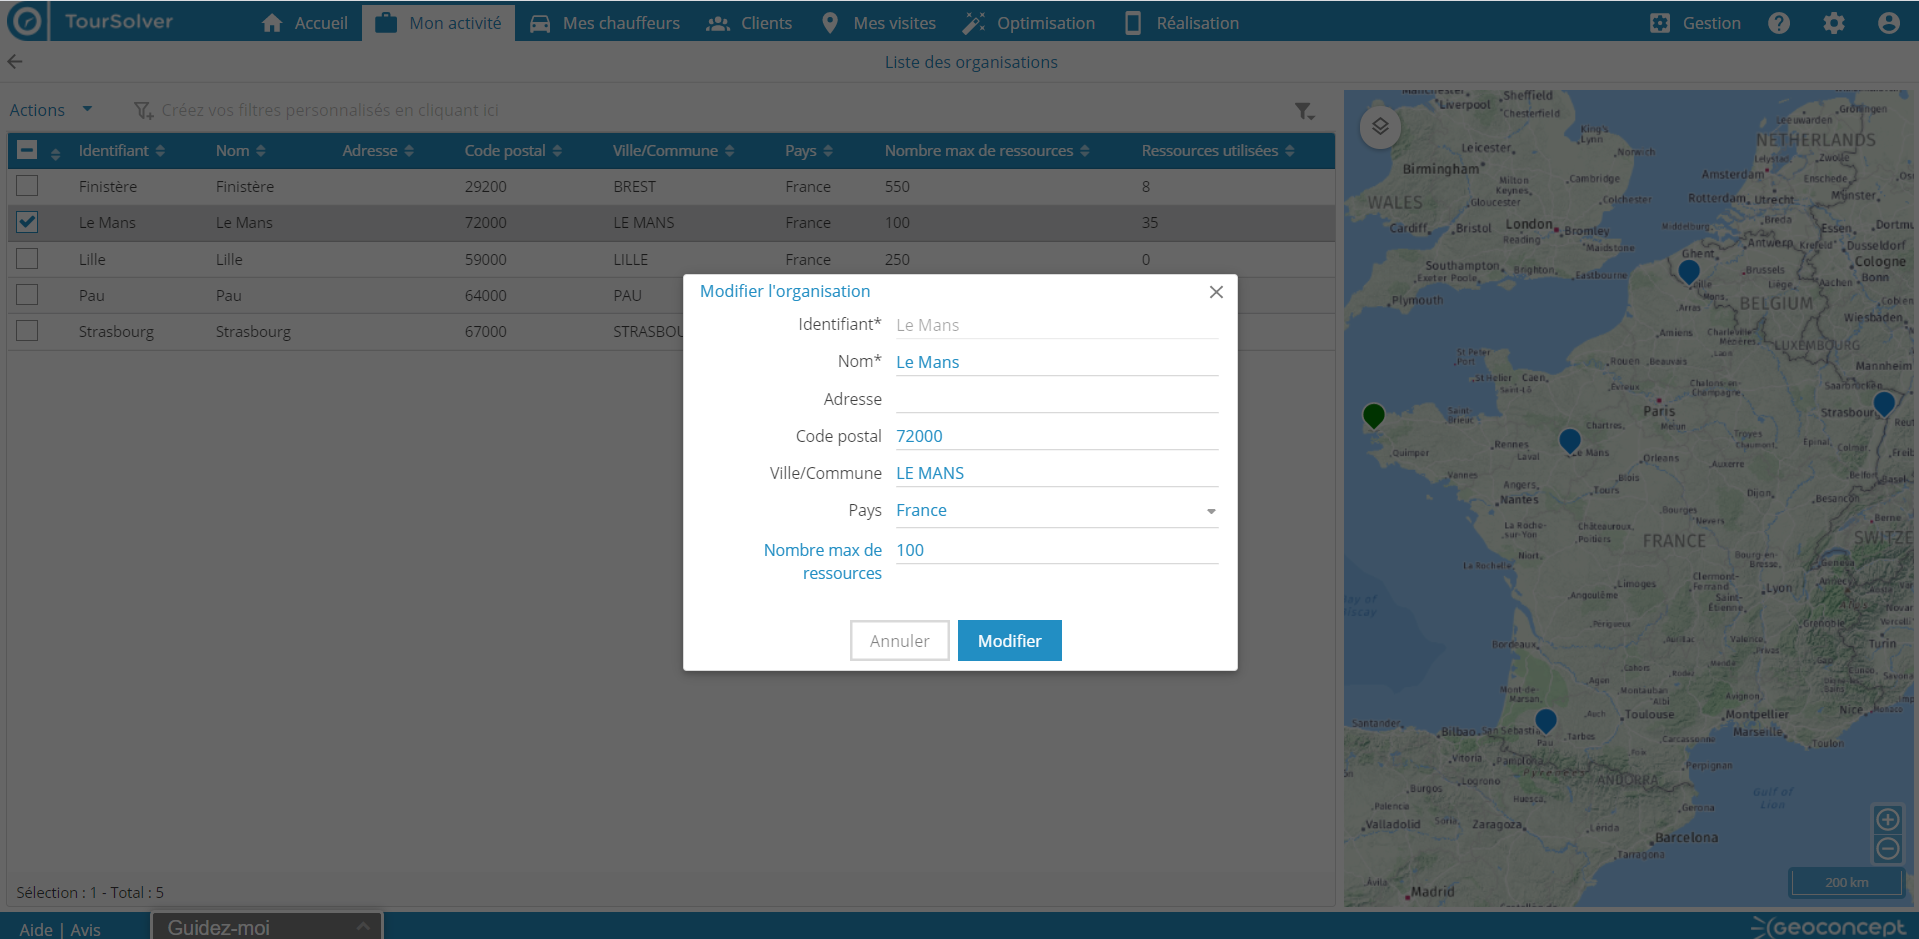
Vue du popup d'edition d'une organisation
Organizations can be imported and/or exported in bulk, using the Actions menu.
For an export, select the organizations you want to retrieve, then click on Actions and Export. An Excel file will be generated, with one row per organization, and the 8 columns present in the TourSolver organizations table.
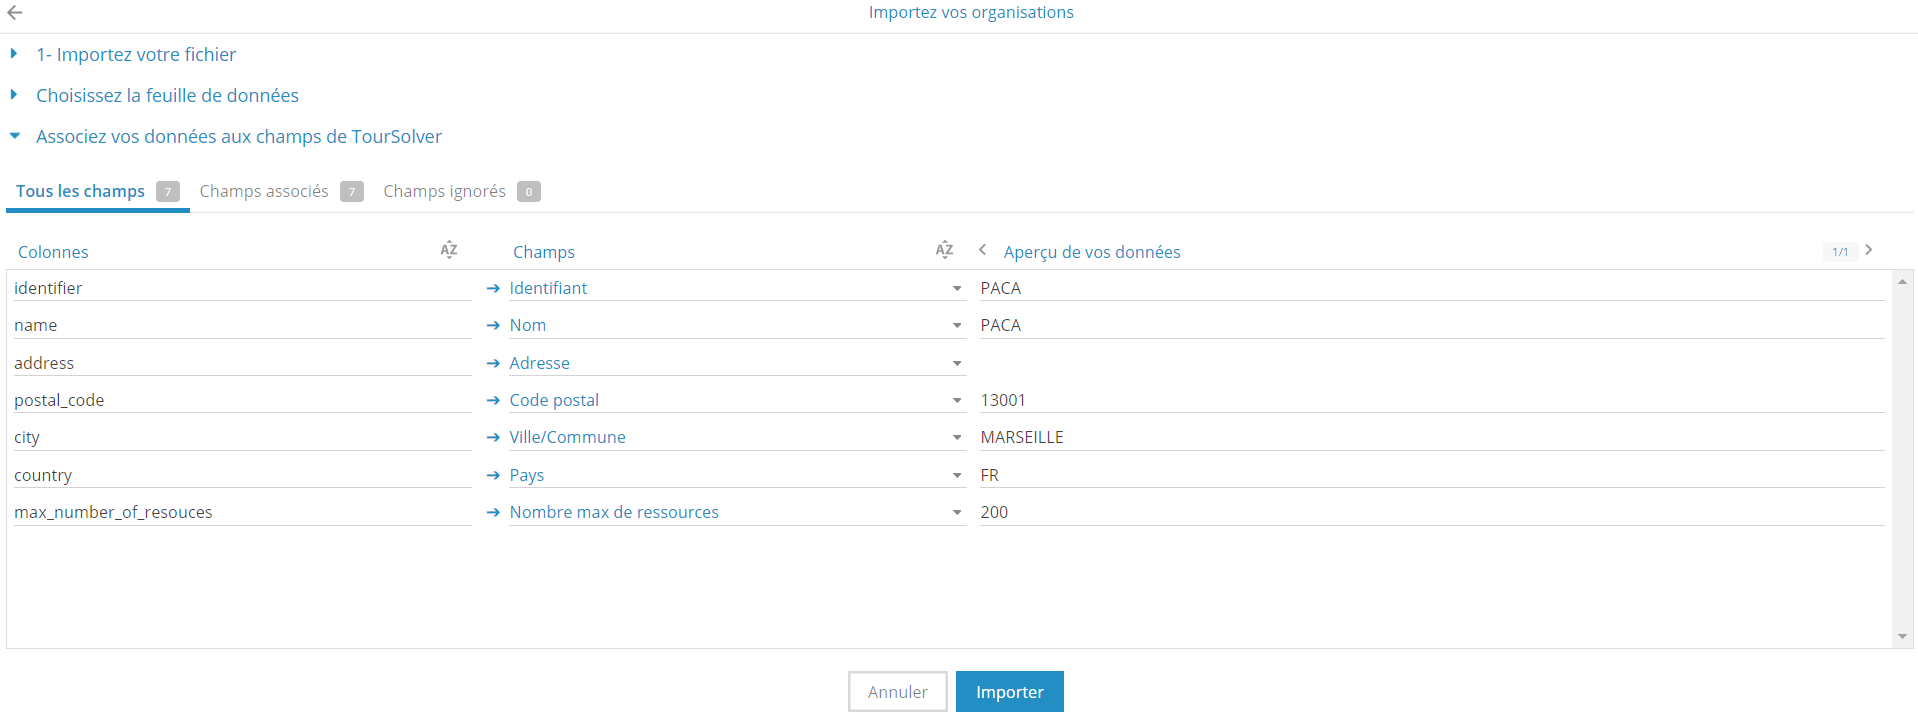
For an import, create an Excel file that contains the 8 columns needed to create an organization. In the list of organizations, click on Actions then Import. Integrate your Excel file and link the Excel columns to the TourSolver fields. The organizations are now created.
Assignment of organization
As we have seen, the organization allows you to filter the data. To do this, you must create several organizations and then assign them to the following TourSolver elements:
- Users
- Teams (resources)
- Clients
> Users
To assign one or more organizations to an existing user, go to the Configuration page and click on the button, then select a user, click on Action and Edit.
The user modification window appears and in the lower part you will find the organizations you have created, by switching them from the left part to the right part you assign the organization(s) to the target user. Finally, click on to validate the operation.
Important: For the action to take effect, you will need to log out and then log back in to your session.
It is also possible not to select any organization, in which case the user will only see the data of the unattached organizations.
> Teams
To assign one or more existing organizations to resources, go to the My Resources page and select the target team. You will then be able to select a single organization for the target team. It is also possible to select the value "No attachment", in which case your team will be visible to all users.
When clicking on the resources you will notice that the organizations are not present, because it is set on the team and not on the resource.
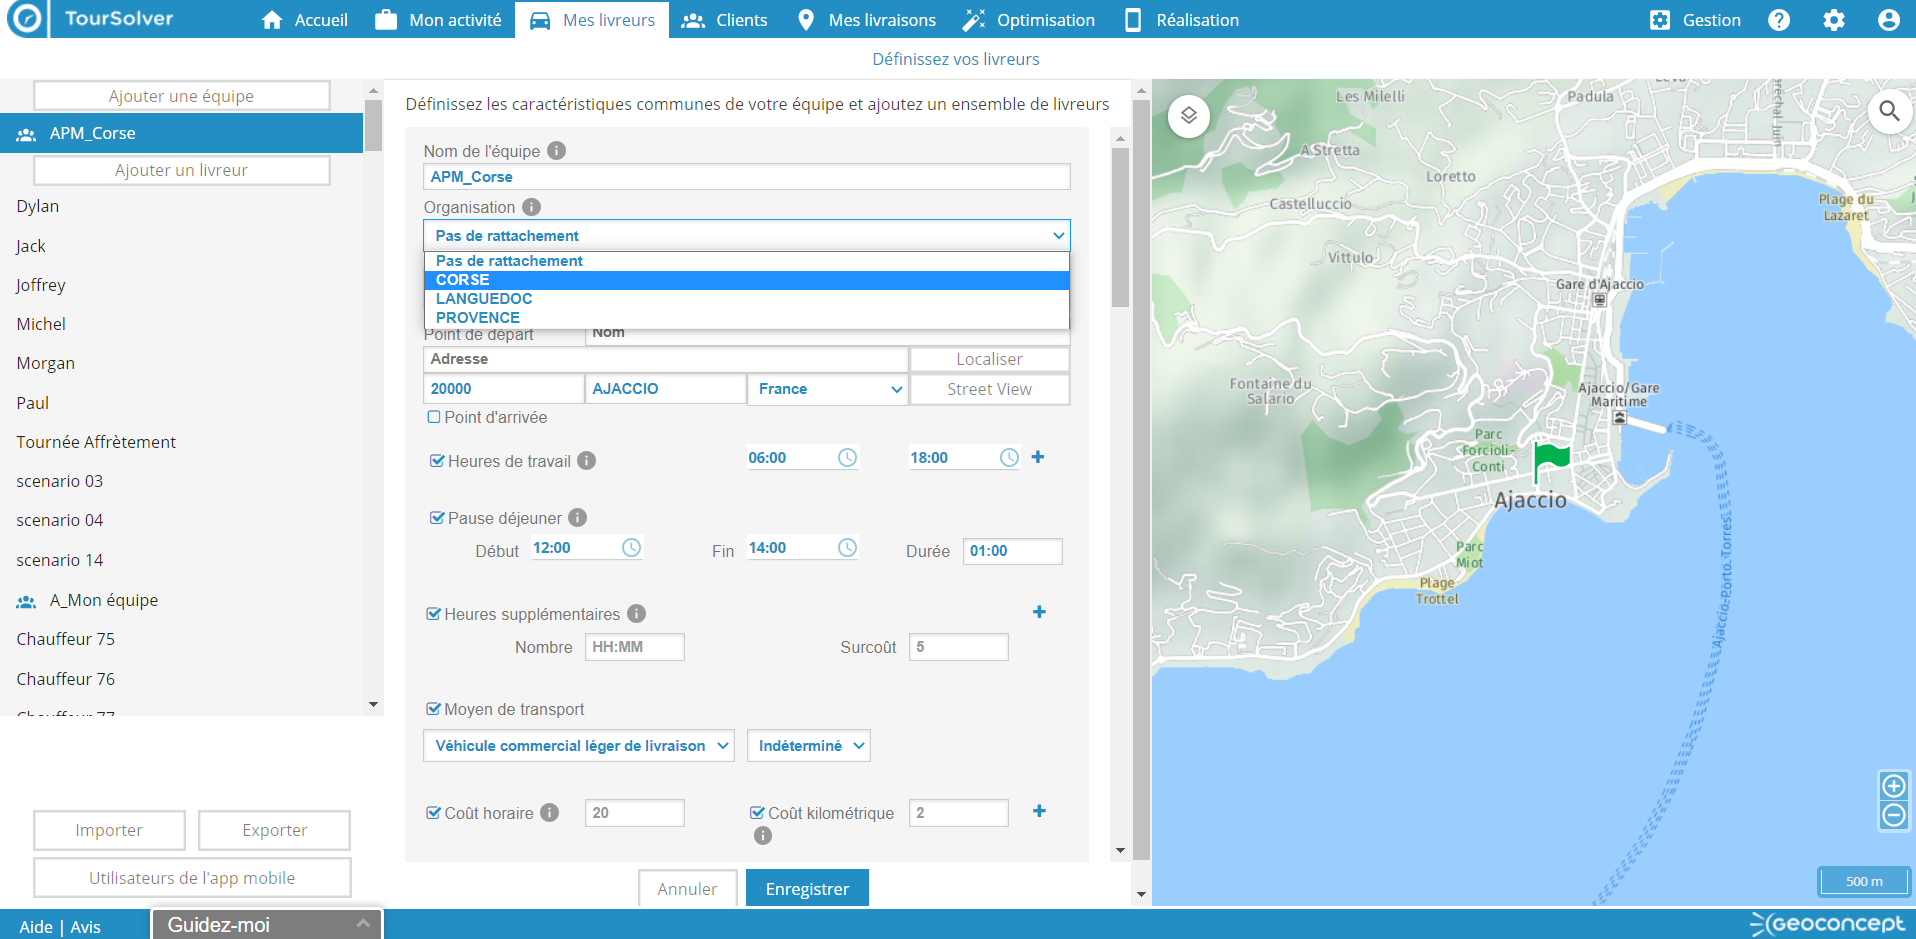
View of the resource page with an allocation list of organizations on the "APM Corse" team.
> Clients
To assign an existing organization(s) to clients, you must first have the modification and consultation roles of the clients.
If you want to modify or manually assign an organization to a particular customer, go to the clients page, select the target customer in the table, then click on the Action button, then Edit, the customer record appears on the screen, go to constraints, the organization field is editable manually.
It is also possible to import your customers with the target organization. To do so, please refer to our customer data model documentation to structure your excel file and import the organization assignments by client.
> The case of simulations & visits
There is no organization assignment to be set directly for the simulations, but this does not mean that they do not have one! Indeed, these two elements inherit the organization of the selected team.
If a user assigned to organization A and B has created a simulation based on a team from organization A, then all users from organization A will see this simulation. While a user assigned to organization B will not see it.
Good use!