 How to use the scan in TourSolver and the TourSolver mobile app?
Principles
You wish to guarantee the traceability of your products during the phases of delivery or collection of parts, parcels or pallets? This is possible thanks to TourSolver's Scan functionality. This section explains how to integrate and use this free TourSolver functionality!
Before continuing, a small clarification concerning the vocabulary is necessary: in TourSolver, the term "Scan" covers barcodes and QR Codes.
A few prerequisites to follow this tutorial:
- To have downloaded the TourSolver Mobile App.
- Create at least one resource located in New York. Indeed, to carry out this tutorial (scenario + video) we used resources located in New York. However, if you prefer to put yourself in a situation close to your workplace: no problem! You can of course replace the addresses in the file (to be downloaded below) with your own.
- Download this small dataset to put you in situation.
Shortcuts
> Adapt your data to the expected format
> Manually modify or add scans in a visit
> Share & see the results in the fulfilment page
> Follow the scanned elements in the fulfilment page
Implementation
Estimated duration: 20 minutes
Enable the scan function
Before using the scan in the TourSolver Mobile app, it is necessary to activate the option in the configuration. On the other hand it is possible to leave the depot without scanning all packages.
Attention: when the option is disabled you will not see the information about the packages in the Optimization page. Therefore we recommend that you perform this step first.

Adapt your data to the expected format
You will not need the following paragraph if you use the example file downloadable above. However, we invite you to read it so that you know how to adapt your data to this use.
The data related to the scan should be added in a single column: the Scan column.
You could consider this column as a table, in fact it is possible to import several information related to the same scan in this single column! The Scan column allows you to import:
- the identifiers,
- the order number,
- scan description
Here's a little table to summarize it all:

How do I properly separate my data?
2 separators are expected for the scan:
- The first one is the vertical separator (the following symbol "|"). It makes it possible to distinguish all the useful information, the 3 fields that we have just seen (id, order, description) of a single scan.
- The second one is the comma (","). In the case where 1 customer has several commands to scan, the comma will help us to separate them.
Example 1: my company transports and delivers most of the time only 1 package or 1 pallet per customer. How to declare this pallet for example?
Well if your palette has the scan ID 17598745for order identifier Order-198MPO7 and as a description Miscellaneous productsthen you must declare your Scan column like this: 17598745|Order-198MPO7|Miscellaneous products
Example 2: "In my case it can happen regularly that I transport several parcels with different scans to one addressee, how can I do that?
In this case, in addition to the vertical separator (the "|") that allows you to clearly distinguish the id, order, description of each scan, you must also use the comma "," as a parcel separator.
Example: if a customer has 2 packages to deliver, he can declare this: 17598745|Order-198MPO7|Miscellaneous product,17598746
Note: after the second package (17598746) there is no value. This is possible because the order and description are optional. It is therefore not necessary to add the vertical separators.
We invite you to test the function by downloading our data model (containing scan data) and then importing it as shown in the video below:
View scans and associated data from the Visit panel.
View package details in the Package tab of the Details panel. Can't see the data?
- Make sure the scan feature has been enabled.
- Make sure the Details panel is present in your workspace.
Manually modify or add scans in a visit
In the optimization page, it is possible to modify the data related to the scan you have imported. You can also manually add scans to certain visits.
Share & see the results in the achievement page
When your route plan is prepared, you need to share the routes in order to transmit the visits and the barcodes of each product on the mobile app.
Scan from the mobile app
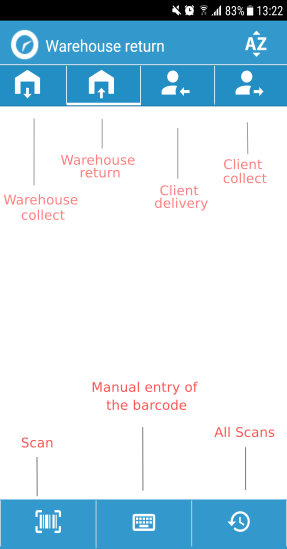
Now it's time to scan from the TourSolver mobile app. To do so, log in to TourSolver mobile, then in the menu go to Scan. The next page appears.
Here is a description of the top buttons:
- Warehouse collect: you are delivering? it is likely that before leaving on tour you will have to scan your items / packages in order to validate and trace the contents of your vehicle.
- Warehouse return: The day or the first tour is over, click here to declare what has not been delivered for example.
- Client delivery: here scan what has been delivered to the customer
- Client collect: are you picking up a parcel / item? Go to this section before loading into the vehicle.
And here is a description of the bottom buttons:
Scan: opens your phone's camera and allows you to scan
Manual entry of the barcode: opens a text editor that allows you to manually enter the scan code. When the barcode is damaged this function can help you to integrate the merchandise anyway.
Validate: Confirms the end of the entry. TourSolver will then warn you if you forget.
All scans: allows you to have a vision of all barcodes / QR code integrated in the tour.
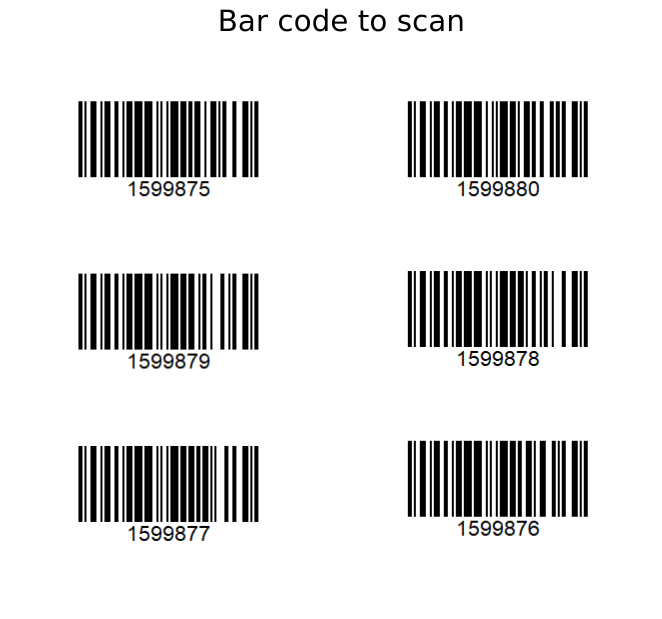
Let's take our practical case: we invite you to scan the barcodes below the next video. You can validate by forgetting a barcode in order to see how TourSolver warns you.
Reminder: if you make a delivery and it seems useless to scan everything at the depot, in the configuration, it is possible to consider that everything is already loaded.

To help you follow the tutorial we provide you with the following barcodes that correspond to the dataset downloaded above.
Follow the scanned elements in the fulfilment page
The realization page allows to follow the loading status of the scans step by step. We invite you to start the visits then to scan the sample barcodes.
Good use !