 Customers- The customer page
Shortcuts
> Generalities
>> Prerequisites
>> Defining a client in TourSolver
> Managing Clients
> Import
>> Compatible format
>> The data model and the example file
>> Association step
>> The update
>> Custom fields
> Add
> Edit
>> General
>> Contacts
>> Location
>> Constraints
>> Quantity
>> Satisfaction
>> Other
>> Documents
>> History
> Edit without geocoding (file)
> Export
> Optimize
> Sectorize
> Data synchronization
>> between the client page and the optimization page
>> between Mobile and the the client page
Basic principles
As a route planner, you may have to manage a large number of customers with many different characteristics. The customer page allows you to import and manage up to 100,000 customers.
Unlike the visit page, the data in this page is persistent. This means that it is not necessary to re-import an Excel file systematically when you want to launch an optimization. You can for example select a part of your customers and decide to launch a sectorization or an optimization from this selection.
On the other hand, the customer page is the place where all the returns made via the TourSolver mobile app are stored and displayed. For example, it is possible to:
- See what date and time a customer was visited in the past
- See if there was a delay compared to the communicated time slot
- Consult the level of satisfaction of a customer
- Collect the last known GPS location of a customer (via TourSolver mobile) to make it the reference address for a next visit.
== Back to the table of contents ==
Utilisation
Generalities
Requirements
Before you learn more about the subject, it is important to know that all the functionality described below is only available with the Premium license level. If you are interested in this feature, please contact us via the > Contact page
To activate the "Customers" page, here are the 2 prerequisites :
- Ask your administrator to grant you the "Customer List" role. If you are an administrator, click here to see what the role allows you to do. Note: there are 2 other roles that allow you to import or modify customers. You must have them to be able to add and edit a customer list.
- If the previous prerequisite is covered, then go to My Preferences, then check the option Activate the customer page. The Clients tab will then be visible. Please note! If you don't see this activation option, it means that you don't have the right (see point n°1).
Definition of a client in TourSolver
A client is a person, a company or a place, geolocated using its geographical coordinates, that the resource(s) will visit. This client can have many specific constraints: opening/closing hours, frequency, compatibility... which are imported in the Clients page, and used during the optimizations.
== Back to the table of contents ==
Managing clients
View clients
After the initial import, all customers are visible on the map and in the customer list. He can then use the filters to display and/or hide only certain customers. Click here to read the documentation on how to use the filters and coloring.
Users will be able to view clients according to the roles they have been assigned upstream by the Administrator, as specified here
Also, users will only be able to view clients that belong to the same organization as them. Click here for more information.
Editing clients
To add a new user, you can click on Action and then Add, the user form to be filled in will appear on the screen. The information marked with a * is mandatory:
Reference
Longitude
Latitude
The other fields to integrate are documented here
== Back to the table of contents ==
Import
Compatible format
- XLSX or XLS (Microsoft Excel)
- ODS (Open Document Spreadsheet)
- CSV (user must specify the separator to be used in My Preferences)
- TXT (text separated by tabs)
The data model and the example file
About thirty fields can be imported, only the reference field is mandatory.
The list of field description can be downloaded directly from the customer page. it contains comments on each column presenting the format and behavior of each field. On the other hand, the file is composed of a "simple template" tab of 13 fields only which allows to start quickly the import, and a "complete template" of 34 fields.
Please note! by hovering with your mouse over the field headers the field description appears with the format instructions.

Association step
When importing, TourSolver assists you in associating your fields with an interface that notifies you of format errors and gives you advice on how to solve the problem.
The update
The created import updates the reference if it already exists in the client database. Warning: in case of an update, the addresses are re-geocoded! Also, the modifications of locations (manual repositioning or other..) could be lost. In this case, we invite you to use the "Edit without geocoding (file)" function.
Create custom fields
Sometimes it may be necessary to import data from your company that will be used in the mobile app or from the customer experience pages.
In this case, you can create custom fields that can be associated in TourSolver. The main interest lies in the fact that you will be able to keep the format of this data by declaring if it is a list of values, a date, a number or a url for example.
== Back to the table of contents ==
Add
In the Actions menu, the Add button allows you to manually create a customer in the database, unlike the Import button which allows you to import a list of customers. To validate the creation of the customer, you must have at least filled in the Customer reference in the General tab, and the address/postal code/city or XY coordinates in the Location tab.
Also, you must check the Customer box in the General tab if you do not want your customer to be created as a prospect in the database (fill in the Customer field with the value Yes/No).
== Back to the table of contents ==
Edit
General
The fields marked with the symbol * must be filled in. This is the case for the Reference field, available in the General tab. It is also possible to modify: the type, the designation, the description, the customer (yes/no), the sector of assignment if existing and the color of the point.
Contacts
When present, the contact information also appears on the mobile app when you view a customer or visit record. This can help delivery people, technicians, or others to get in touch with your customers!
You can find the Name, First Name, Occupation of the customer, and his contact information: email address, phone and cell phone.
This information is visible via the mobile app. On the other hand, if the checkbox Receive notifications is checked is activated, then sending emails and / or SMS to the customer is allowed.
Location
The location tab allows the user to view the client's existing location, consult it and modify it if necessary. To modify the location, the user can:
- Modify the entry address, select the most relevant location by moving the pin manually in the map
- Validate a position reported by a mobile application user in the field.
This is only possible if the Client Repositioning Access option has been enabled in Configure Mobile Application.
== Back to the table of contents ==
Constraints
-
Organization : [This field has no impact on the planning]
> Description : allows you to categorize the client portfolio to make it visible to some users rather than others. Useful for dividing your client list into regions, for example, when planners need to see only the clients in their region
-
Last visit date [This field has no impact on the planning]
> Description : It can be filled in by you, or automatically by TourSolver itself when a visit has been made with the mobile app. This field is currently not taken into account in the case of recurring visits.
-
Next visit date [This field has no impact on the planning]
> Description : This field is automatically updated by TourSolver when a customer visit has been scheduled and then shared to the mobile app (via the optimization page). The date corresponds to the date when the visit was scheduled -
Possible visit days (1, 2, 3...) [This field has an impact on the route plan]
> Description : This constraint contains all the possible visit days for calling in at the site (up to 64) to which the time window defined by the Opening times 1 and Closing times 1 constraints applies.
Format: numeric or date
These days may be defined one by one (1,4) or by time slot (1-4), as an integer (1,2, ...64) or in date format (14/05/2016 `=>` 17/07/2016).Example: Opening days 1 = 1-5 (or 14/05/2022 `=>` 18/05/2022) signifies that the visit may take place on all days 1, 2, 3, 4 and 5 in the planning (or between the 14/05/2022 and the 18/05/2022) at the times defined by the Opening time 1 and Closing time 1 constraints.
-
Opening time (1, 2, 3..) [This field has an impact on the route plan]
> Description : These constraints let you define a time window over which the visit may be performed.Opening time 1 corresponds to the time from which the visit can be performed. Closing time 1 corresponds to the time after which the visit can no longer be performed.
This time window will apply to all days unless Opening days 1 has been defined. In this case, the time window is applied only to this value. If a time window is not documented for any given visit, the visit can be performed at any time, on any of the Opening days as defined and within the resource's working time limits. You can define up to 4 different time windows (and their associated days) for each visit.
-
Required skills [This field has an impact on the route plan]
> Description : This constraint designates the criteria required by the client that the resource must follow in order to visit the client. -
Frequency [This field has an impact on the route plan]
> Description : This is the number of times you visit a customer over a period of time. To say "we visit this customer twice a week" you can write: 2/7 or 2/5 (if the weekend is not worked).These visits are automatically generated and scheduled by TourSolver. The distribution of visits within the period and resources is configurable using symbols: #~*.
Example:
2/5 = "We visit this customer twice a week". Attention! Visits can be grouped on the same day! Here is an example of the possible placement of each visit in the week 1,1|1,2|2,2|1,3|2,3|3,3 etc..
2/5~ = "We visit this customer twice a week, at least 1 day apart". Here is an example of the possible placement of each visit in the week 1,3 | 1,4 | 2,4 | 2,5 | 3,4
2/5~~ = "We visit this client twice each week, at least 1 day apart, with the 1st visit on the 1st or 2nd day and the last on the second to last day". Here is an example of the possible placement of each visit in the week 1,4 | 2,5
2/5* = "The same resource visits this client twice each week". You can also add a star in all cases 2/5*~, 2/5*~, 2/5*~# - Minimum spacing between visits [This field has an impact on the route plan]
> Description : This constraint allows you to indicate the minimum number of days required between two visits of a same customer.
Format: integer
If the number of recurrences of the frequency is more than one, the constraint is not considered.
Example 1:
Visit frequency = 1/5
Minimum spacing between visits = 3
Worked days = 1-15
To respect a gap of 2 days between 2 visits, the customer don’t must be visited 5,8,11 days, but 5,9,12 days.
-
Maximum spacing between visits [This field has an impact on the route plan]
> Description : This constraint allows you to indicate the maximum number of days required between two visits of a same customer.
Format: integer
If the number of recurrences of the frequency is more than one, the constraint is not considered.
-
Frequency type [This field is descriptive and has no impact on the planning]
> Description : It can facilitate the realization of filters in the list of clients. If you want to set up visit frequencies, you should fill in the frequency field.
-
End visit before closing time [This field has an impact on the route plan]
> Description : This constraint allows you to define whether the visits can finish after the end of the indicated time window. By default, a visit that starts in the time window can continue beyond the finish time. If it is desirable for the visit to end before Closing time 1, this constraint must be activated.
Format: binary
Example:
In the event that End visit before closing time = 0
In the event that End visit before closing time = 1
-
Starts before [This field has an impact on the route plan]
> Description : In case of optimization, it allows to link visits to be carried out in a row. Example: see customer A and then customer B (in the same day).
To use this constraint, you need to add the reference of customer B in the value Start before customer A. This constraint is only taken into account by the new optimization engine.
== Back to the table of contents ==
Quantity
Quantities can be managed in this page when they are recurring, or updated regularly using the Edit without geocoding feature. Quantities can be stored in up to 24 fields, to represent different units of measure or products.
Satisfaction
The user finds the information provided by the customers via the customer experience page, namely the last review, the last comment and the ID of the last visit.
Other
When importing, the fields created in manage fields are placed in this section
Documents
The user finds the documents that were associated with the customers during the import, manually or after a visit. Each document has 7 pieces of information:
- Identifier: unique ID of each document
- Name of the file
- Type: the file can be in image format (.png, jpg) or document format (.pdf, .word, .excel...)
- Import date
- Send: if the option is checked, the document can be consulted on the cell phone of the resource in intervention
- Upload
- Delete
It is possible, in the Actions, to import, download or delete documents.
History
The visit history is displayed. It contains information about the start time of the visit, the status (abandoned, completed, accepted...), the actual duration, the quantity as well as the duration of delay in relation to the customer's time constraints.
== Back to the table of contents ==
Edit without geocode (file)
In the Actions menu, the Edit without geocode (file) button allows you to edit several clients per file (Excel, Excel365 or Google sheet) in the database. This function has the same characteristics as the Import function except that it does not geocode. This allows you to keep the location modifications (manual repositioning or other..) made by the users.
== Back to the table of contents ==
Export
In the Actions menu, the Export button allows you to export the list of clients in Excel (.xlsx) format at a given time.
You can specify if you want to export the whole database or only the clients selected before. In the same way, you can recover all the fields, or use a personalized configuration.
== Back to the table of contents ==
Optimize
To launch an optimization from the Customers page, you must first select the customers to be optimized, either manually or using filters, before clicking on Action -> Optimize.
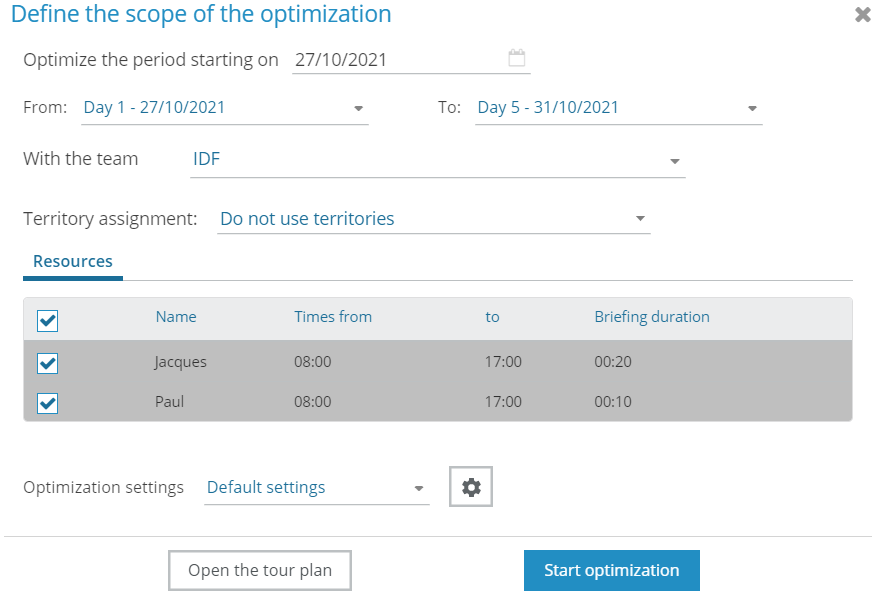
The optimization settings page appears. Select the period to optimize and the team to use. You then have 3 options available to you:
- Do not use territories : run a standard optimization
- Use existing territories : is based on the values of the territory field. If these values are filled, TourSolver proposes to assign a territory to a driver
- Rune a territory assignment before the optimization : run the territory management software before the optimization
== Back to the table of contents ==
Sectorize
By selecting several clients, it is possible to open the sectorization module.
TourSolver will ask you to add the criteria to be integrated into the sectorization (e.g. duration of visit quantity) and also the team on which to carry out the sectorization.
== Back to the table of contents ==
Data synchronization
between the client page and the optimization page
It is possible to create a client from the optimization page. This client will be synchronized in the client list.
It is also possible to modify a value of this client from the optimization page.
between Mobile and the the client page
Lors de la configuration de l'app mobile il est possible d'importer les champs de la liste des clients
Happy TourSolving!
== Back to the table of contents ==